
Did you know that you can back up your WordPress site on Google Drive?
If you have a Google account, you already have 15 GB of cloud storage for free. You can use this storage to keep a copy of your site in reserve, just in case something bad happens, and you need to reset.
In this article, we’ll show you how you can automatically backup your WordPress site to Google Drive.
Why backup your WordPress site to Google Drive?
A backup is a copy of your website that is stored separately, and is one of the most important ways to keep your site safe. If something goes wrong with your website, you can restore a backup with a few clicks to work again.
Even in the worst case scenario where a hacker breaks into your WordPress website and deletes your data, you can simply restore a backup and restore your site again.
Many website owners also create a backup before making a major change to their site, such as editing their WordPress homepage or installing a new theme . If the change breaks their website, they can simply restore a working copy of their site from a backup.
By backing up your site to a cloud storage service such as Google Drive, you can restore your site even if your main hosting account has been hacked. Also, it won’t take up precious storage space on your WordPress hosting plan.
By creating a Google account, you will automatically get 15 GB of free cloud storage that you can use for backups and file storage. If you need more space, prices will start from 1.99 dollars per month for an additional 100 GB.
How to back up your WordPress site on Google Drive?
WordPress does not come with a built-in backup solution. However, there are many great WordPress backup plugins that make it easy to back up and restore your site.
UpdraftPlus is the best backup plugin for WordPress software. This free plugin allows you to create scheduled backups, so you can automatically backup your WordPress site to Google Drive.
Beginning, you will need to install and activate the UpdraftPlus plugin . For more details, see our step-by-step guide on how to install the WordPress plugin .
Once UpdraftPlus is activated, you can configure the backup settings and choose Google Drive as the storage destination.
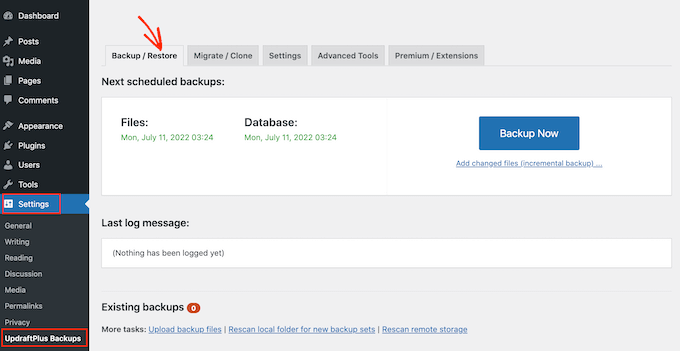
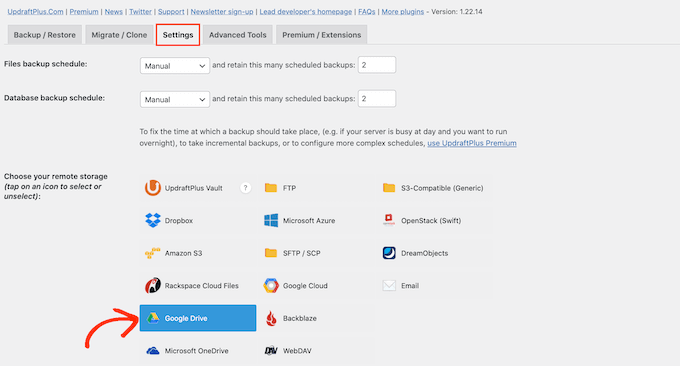
To do this, head to the settings “UpdraftPlus Backups in your WordPress dashboard. Then, just click on the “Settings”tab.
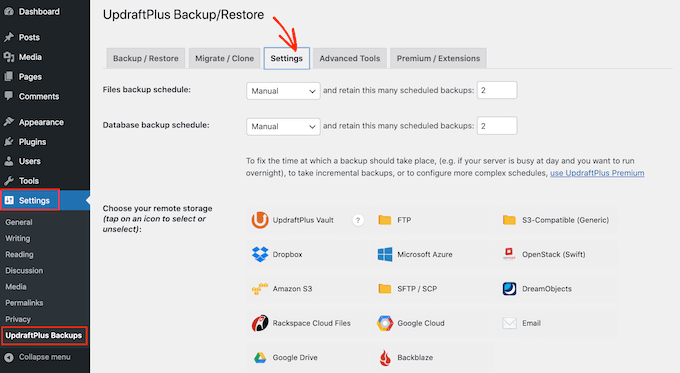
UpdraftPlus makes it easy to save backups to various online storage services including Dropbox, Amazon S3, Microsoft OneDrive and many more.
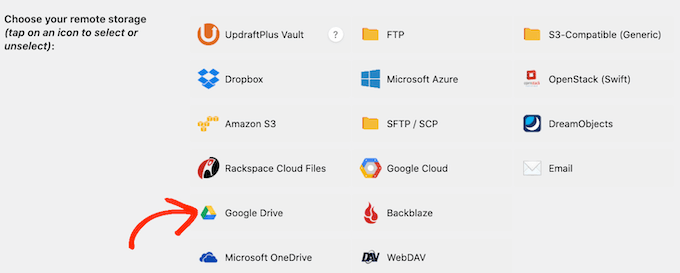
Since you want to backup your WordPress site to Google Drive, Go and click on “Google Drive” in the section entitled “choose remote storage”.
After choosing Google Drive as your storage location, you will need to grant UpdraftPlus access to your Google account.
To get started, click on the “sign in with Google”button.
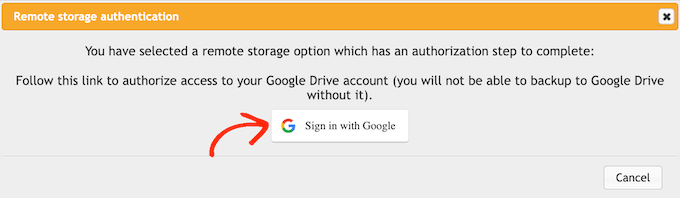
Now follow the on-screen instructions to grant UpdraftPlus access to your Google account.
After reading the disclaimer, you can click on “full setup” if you are happy to go ahead and authorize UpdraftPlus access to your Google Drive.
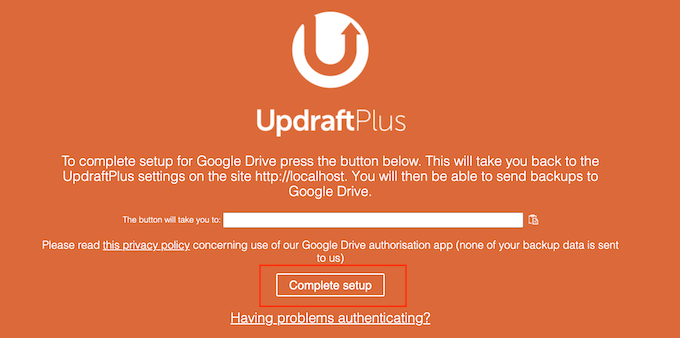
Once you do this, UpdraftPlus will take you back to the main settings page in the WordPress dashboard.
How to create an automatic backup schedule for WordPress?
After choosing Google Drive as your storage location, you are ready to create an automatic backup schedule.
Stay on the “Settings” tab, scroll to the bottom of the page and click the “Save Changes”button. UpdraftPlus will now automatically back up your site based on your schedule.
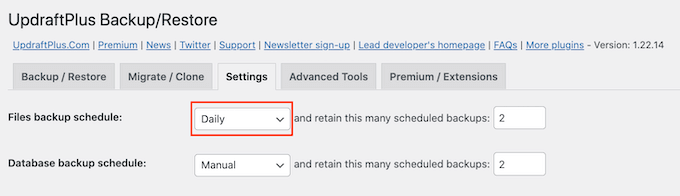
UpdraftPlus divides backups into two parts: files and database.
Let’s start with the files. As part of this backup, UpdraftPlus will create a copy of the code files of your site, plugins, theme files and images.
To get started, just open the “file backup schedule” drop-down menu and choose how often UpdraftPlus should back up your WordPress site.
You can choose from once a month, and even once every two hours.
When creating a Schedule, think about how often you update or add new content to your site. For example, if you post a couple of blog posts every week, you may want to back up your WordPress blog once a week instead of daily.
If you update your site frequently, you will need to back up frequently.
In particular, if you are running an online store, you will usually want to back up your site as much as possible. This way, you can avoid losing important information such as new orders or customer’s payment details.
After choosing the frequency of your backups, you will need to choose the number of different backups that UpdraftPlus should keep. This will help you optimize the storage space you use.
You can do this by entering this number in the text field next to “… Keep this number of scheduled backups.”
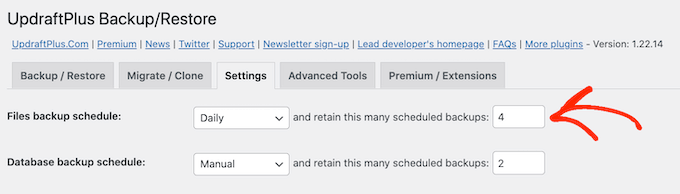
You can change these settings at any time, so if you are not sure, you can start by saving a larger number and then reduce it if the backups use a lot of space.
Once UpdraftPlus reaches the number you specified, the plugin will replace the older version with newer WordPress backups.
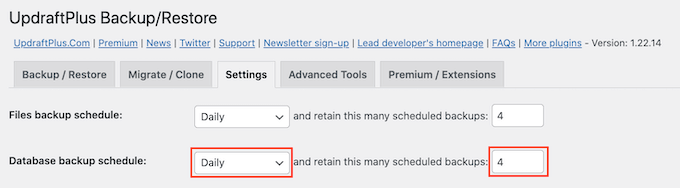
Next, you need to create a backup table for your WordPress database in the “database backup table”section.
WordPress stores all its posts, pages, comments, links and website settings in the database, so it is as important to create backup copies of the database regularly as with files.
You can tell UpdraftPlus how often it should back up your database, and how many copies should be kept by following the same process described above.
How to choose what is in UpdraftPlus backup on Google Drive?
By default, UpdraftPlus will include all WordPress plugins, themes, and uploads in Google Drive backups.
On the “Settings” tab, scroll down to the “embed in a backup of files”section. Here, you can choose whether to include plugins, themes, or uploads in your backup.
To create a full-fledged copy of your WordPress site, you will need to leave the three default checkboxes checked.
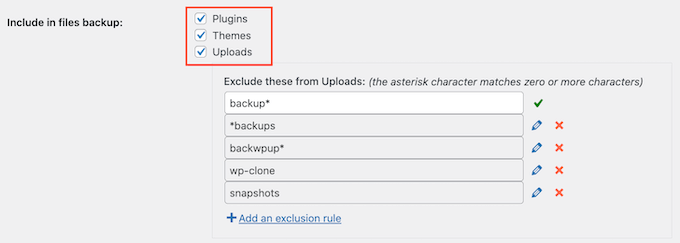
If you don’t need to include plugins, themes, or uploads in backups, you can just uncheck the box next to this setting. Doing so can reduce the size of backups and take up less space on Google Drive.
If you leave the “Downloads” box checked, you can create some rules about what kind of downloads UpdraftPlus will exclude from its backups.
Some exclusion rules already exist. For example, the plugin is set by default to exclude all files that have the word “backup” in their file name. To create more rules about the type of content that UpdraftPlus will exclude, just click on “add an exclusion rule”.
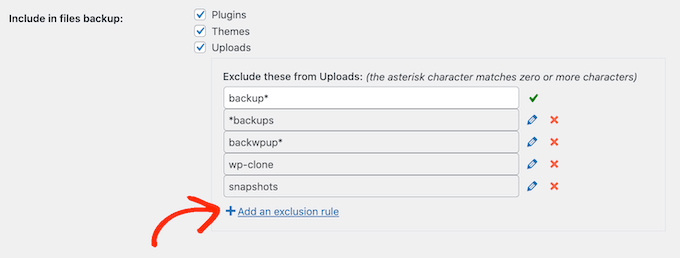
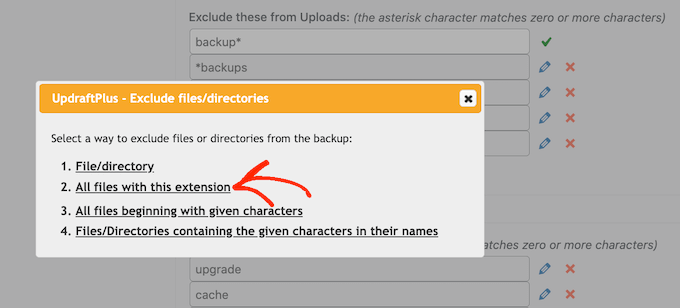
You can then follow the on-screen instructions to create your own exclusion rule.
For example, if you want UpdraftPlus to ignore all PDF files, then you need to start by clicking on “all files with this extension” and type “PDF” in the field that appears.
By default, UpdraftPlus also excludes some files from the wp content folder.
You can see all the default exclusion rules for UpdraftPlus in the “any other directories that are inside the wp content”section.
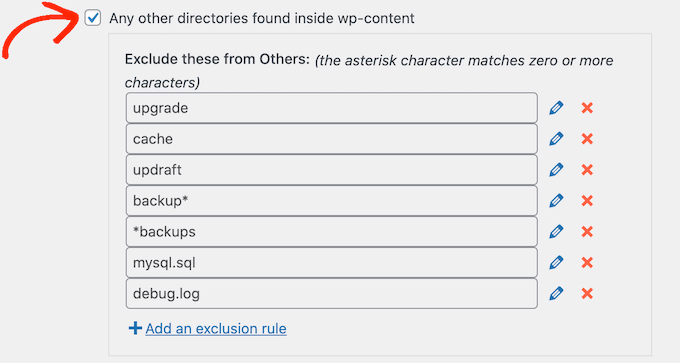
Do you need UpdraftPlus to exclude more content from the wp content folder Just click on” add
an exclusion rule ” in this section and repeat the same operation described above.
If you are not sure what to exclude, we recommend sticking to the default settings. It is quite suitable for most websites.
How to know if the backup of UpdraftPlus to Google Drive was successful?
Every time UpdraftPlus successfully creates a backup, it can send an email notification to the administrator’s email address at your site confirming that the backup is complete. If the backup fails, you will not receive an email.
On the “Settings” tab, scroll to the “email”section. Now you can enable these notifications by checking the box in this section.
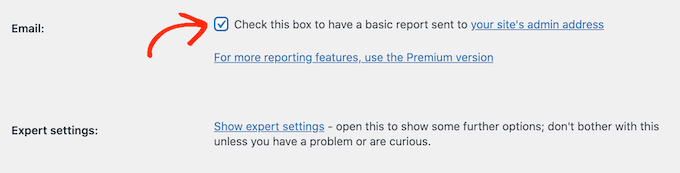
Now, every time UpdraftPlus creates a backup, it will send you an email notification.
Once all this is done, click on”Save Changes”. UpdraftPlus will now back up your site on Google Drive automatically.
If you haven’t received any emails from UpdraftPlus, it’s a good idea to check that the plugin is successfully creating backups in Google Drive.
If you are using the free version of UpdraftPlus, you should find a new “UpdraftPlus” folder in your Google account.
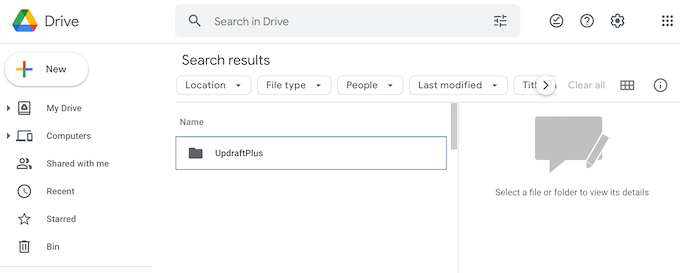
Just open this folder to see if it contains any WordPress backups.
In the following image, you can see an example of how some backups appear in your Google Drive account.

How to back up your WordPress site on Google Drive manually ?
Automated backups are a great way to protect your site. However, even after creating an automatic schedule, sometimes you may still need to create a manual backup.
It’s a good idea to create a manual backup before making any major changes, such as updating your version of WordPress. You can also create a manual backup after posting a lot of new content.
To create a backup copy of your WordPress site on Google Drive manually, go to the settings “UpdraftPlus Backups . You can then simply click on the “Backup / Restore”tab.
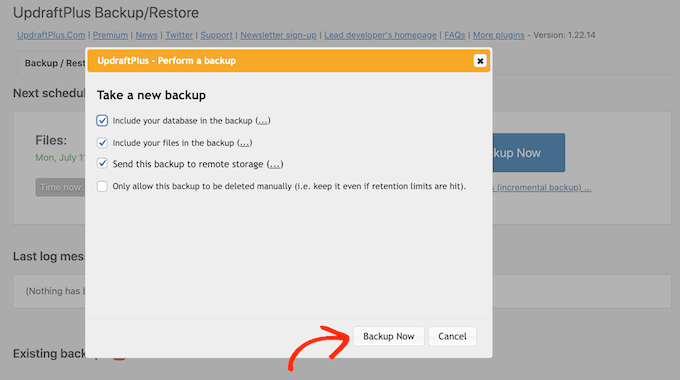
To go ahead and create a manual backup now, just click on the “Backup Now”button. UpdraftPlus will show some basic settings that you can use to configure manual backup in Google Drive.
As with automatic backup, UpdraftPlus switches by default to backing up all your files and the WordPress database. It will also use the same remote storage location that you use for automatic backups. For us, This Is Google Drive.
The default settings should be good enough for most websites, so when you’re ready, click the “Backup Now”button.
Restore your WordPress backup using UpdraftPlus
Creating backups with UpdraftPlus is easy, but the really useful part is the ability to restore them from Google Drive just as easily.
If your WordPress site has been hacked or you just want to start over, the first step is to delete everything and install WordPress again.
Once you have done this, you will need to install and activate the UpdraftPlus extension again on your new WordPress site.
When activated, head to the settings “UpdraftPlus Backups page and click on the” Settings “tab.
In the “Choose remote storage” section, click Google Drive.
Now you can follow the on-screen instructions to give UpdraftPlus access to the Google account where you saved all the backups of your website In Drive.
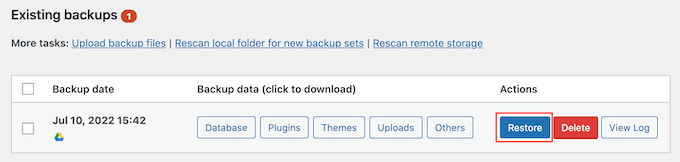
After connecting UpdraftPlus to your Google account, click on the “Backup / Restore”tab.
UpdraftPlus will now scan your Google Drive and list all the backups it detects. Once finished, you can simply find the backup you want to restore and click “Restore”.
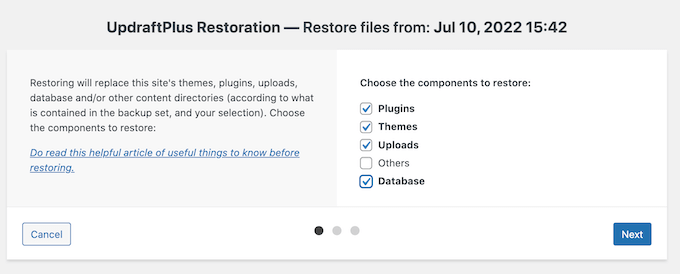
After that, choose the components that you want to restore. If you are restoring to a new WordPress installation, checking all the boxes is probably the best idea.
After choosing your ingredients, go ahead and click on the “next”button.
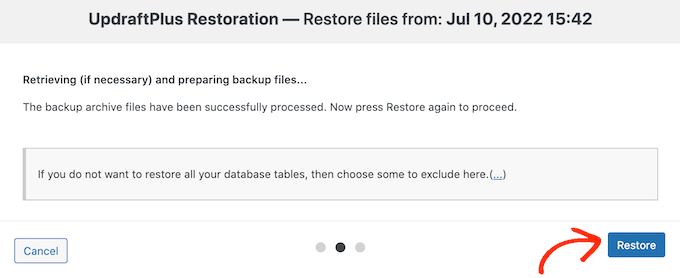
UpdraftPlus will now get all the files it needs to restore WordPress backup from Google Drive.
Once you have successfully imported all the files you need, just click the “Restore”button. UpdraftPlus will now restore your backup from Google Drive.
This may take a few minutes depending on the size of the backup and the speed of your internet connection.
Once finished, you will see a “successful restore” message at the end of the activity log. At this point, you can click the “back to UpdraftPlus Configuration” button to return to the settings and finish things.
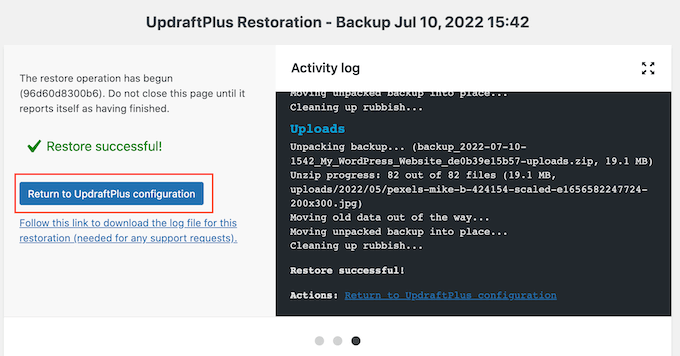
That’s it! Now you have successfully restored your WordPress site from Google Drive.
We hope that this article helped you learn how to back up your WordPress site on Google Drive.