
Did you know that you can install WordPress and use it in multiple languages?
Yes, you can even create a multilingual website using WordPress by translating your content into different languages. In this article, we will explain how to easily translate your WordPress website using TranslatePress.
Why Use TranslatePress plugin for WordPress Translation?
The best part about WordPress is that it can be used in any language. Most WordPress themes and plugins can also be translated into any language.
If your website caters to a multilingual audience, translating your content can be very beneficial.
You can use automatic translations like Google Translate, but these translations may not be accurate and can sometimes be misleading.
On the other hand, if you use a multilingual WordPress plugin, you need to create multiple posts that require switching between different languages.
TranslatePress is a WordPress translation plugin that helps you solve all these issues.
- You can translate your website and content using a live editor with real-time previews for each page on your site.
- You can switch languages instantly from the live editor.
- Easily translate the theme, content, and plugins using the same interface.
- Use Google translation for automatic translations and only edit the parts that don’t make sense.
Let’s take a look at how to easily translate your WordPress website using TranslatePress.
Translating WordPress with TranslatePress plugin
The first thing you need to do is install and activate the TranslatePress plugin.
For more details, check our step-by-step guide on how to install WordPress plugins.
If you want to translate your website into multiple languages, you will also need to install the “Extra Languages” add-on. You can do this from the Add-ons section under your TranslatePress account.
With TranslatePress, translating your WordPress website becomes a breeze, and you can reach a wider audience by offering content in various languages. Enjoy a seamless translation experience with TranslatePress!
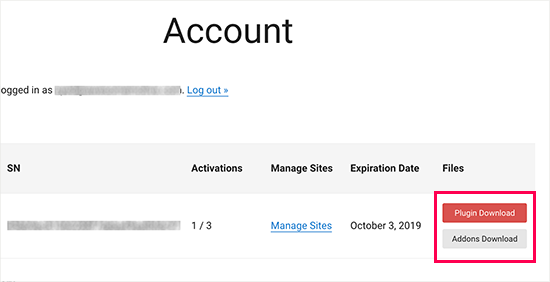
After downloading the add-on, you can install and activate it just like any other WordPress plugin.
Once activated, you need to visit the “Settings » TranslatePress” page to configure the plugin settings.
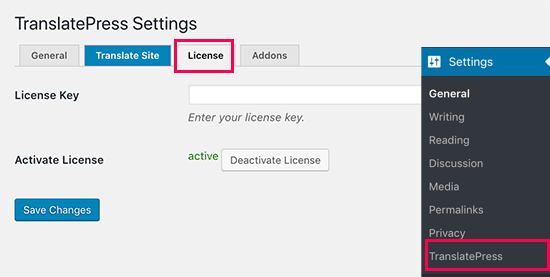
First, you need to switch to the “License” tab and enter your license key. You can find this information in your TranslatePress account on their website.
After that, you need to switch to the “General Settings” tab to configure the other settings.
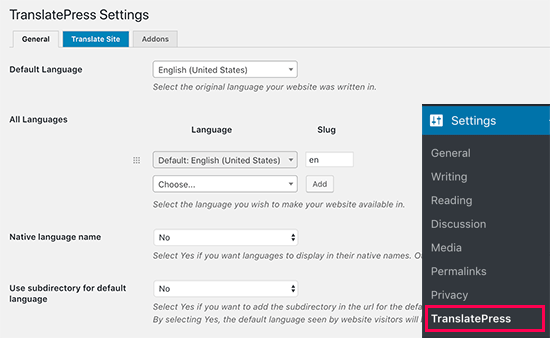
The first option on the page is to choose the default language for your website and the languages you want to translate your website into.
Next, you need to select whether you want to display language names in their native language. The default option is “No,” which means that language names will appear in the default language.
The following option is to choose whether you want to display the default language name in the URL as a subdirectory.
For example, http://example.com/en/.
The default option is “No,” which means that other languages will only have the language name in the URL as a subdirectory. We recommend leaving this setting as it is for better search engine optimization.

After that, you will be taken to the next setting, “Force language in custom links.” The default option is “Yes,” as this will change the custom links for translated languages, making the URLs more user-friendly for search engine optimization.
Next, you need to choose whether you want to use Google Translate for automatic translations. The default option is “No,” but you can change it if you wish to use Google Translate.
You will need to provide a Google Translate API key in the next option. You will find a link below the option that will provide instructions on how to obtain one.
Finally, you will arrive at options for displaying the language switcher on your website. TranslatePress offers you three options. You can use a shortcode, add a language switcher to your navigation menu, or display a floating menu. We will explain how to add the language switcher to your website later in this article.
Go ahead and click the “Save Changes” button to store your settings.
Translating Your Website Content
To translate your website, you can simply click on the “Translate Site” tab in the plugin settings page or the button located in the WordPress admin bar.
![]()
Correct! This will open the live translation editor in a new browser tab.
In this live editor, you can click on any text on your website in the right column, and TranslatePress will load it into the left column for translation.
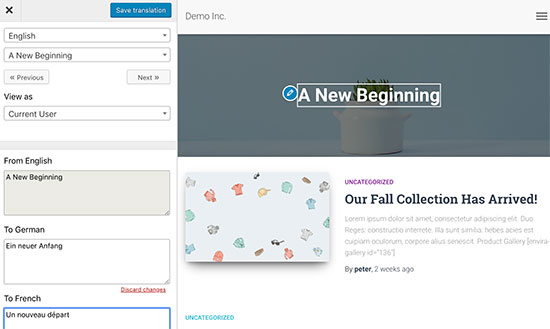
Absolutely! After selecting the language you want to translate the string into, you can proceed with entering your translation.
Once you have entered the translation, click on the “Save Translation” button at the top and then click on the “Next” button. TranslatePress will automatically load the next string on the page for translation.
You can also click on the dropdown menu below your default language, and it will show you a list of translatable strings on the page. You can select a string and submit its translation.
![]()
Exactly! TranslatePress allows you to translate all the content on any page, including navigation menus, buttons, sidebar widgets, tooltips, and more.
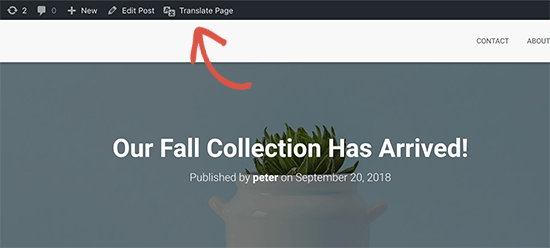
You can also navigate to any page on your website by clicking on the links displayed on the screen and start translating that page right away.
TranslatePress enables you to start translating any page or post on your website as soon as you log in. Just click on the “Translate Page” button at the top to access the live editor and begin translating the content.
That’s correct! Once you translate a string, TranslatePress will automatically apply the translation in other corresponding places.
For example, if you translate the title of a post, it will automatically be translated in your sidebar widgets.
Adding a language switcher to your website
allows visitors to select their preferred language when they visit your site. It’s typically displayed as a flag for each country to indicate the available languages on your site.
TranslatePress makes it easy to add a language switcher using a shortcode, as a navigation menu item, or as a floating banner. The language switcher can be displayed as flags, language names, or both.
To add a language switcher in WordPress using a shortcode, simply add the shortcode [language-switcher] to your posts, pages, or sidebar widget where you want the language switcher to appear.
![]()
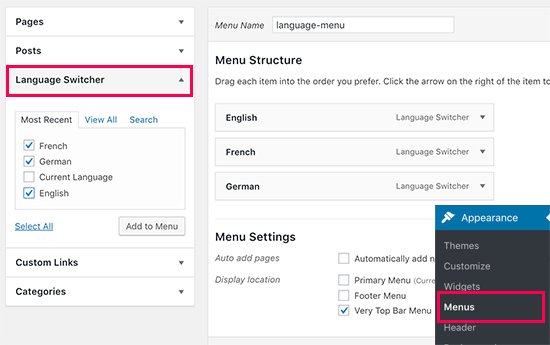
To add a language switcher to the navigation menu in WordPress:
Sure! To add a language switcher to the navigation menu in WordPress, you can follow these steps:
- Go to the “Appearance » Menus” page in your WordPress dashboard.
- Click on the “Language Switcher” tab in the left column to display the language switcher options.
- Select the languages you want to display in the language switcher.
- Click the “Add to Menu” button to add the language switcher to the navigation menu.
- The language switcher items will now appear in the navigation menu. You can change their order by dragging and dropping if needed.
- Don’t forget to click the “Save Menu” button to save the changes.
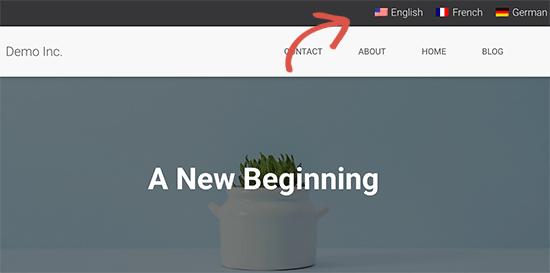
This way, the language switcher will appear in your navigation menu, allowing visitors to choose their preferred language.
ou will now see the languages added to the WordPress navigation menu. Don’t forget to click the Save List button to store your changes.
This is how it looked on our test site :
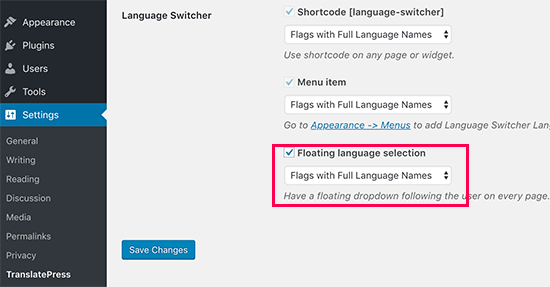
To add a floating language switcher, follow these steps :
- Go to the TranslatePress plugin’s settings page.
- Scroll down to the “Language Switcher” section.
- Make sure to check the box next to the “Floating Language Selector” option.
Once you have selected this option, the language switcher will appear as a floating element on your website, allowing visitors to easily switch between languages as they navigate through your content.
Don’t forget to save your changes to make the floating language switcher active on your site.
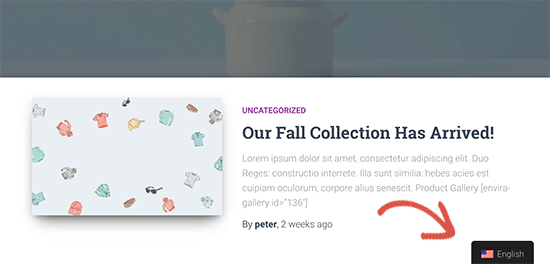
You can now visit your site to see the floating language switcher at the bottom of every page on your website.
We hope this article helped you learn how to translate your WordPress site with TranslatePress .