
Have you ever thought about translating your WooCommerce store into other languages?
New store owners often think they need a separate website for each language. This is not true. You can easily translate your existing WooCommerce store into multiple languages.
In this article, we will show you how to translate your WooCommerce store using two different methods.
The translation is:
Have you ever thought about translating your WooCommerce store into other languages?
New store owners often think they need a separate website for each language. This is not true. You can easily translate your existing WooCommerce store into multiple languages.
In this article, we will show you how to translate your WooCommerce
Why translate your WooCommerce store ?
According to a recent study, 75% of customers prefer to purchase products in their native language.
Displaying product information in their local language helps customers make a decision faster. This also creates a better customer experience which leads to more sales.
Translating your online store into multiple languages is especially useful in the following scenarios:
- You ship internationally and the majority of your customers speak other languages.
- You are selling digital products that are available in multiple languages.
- You are targeting audiences in many countries and regions where English is not the native language.
The best way translating your WooCommerce store is by using the WordPress multilingual extension . .
We are going to share two different WordPress plugins that can do the job well. You can use the quick links below to go directly to the method you want to use.
- Translate your WooCommerce store using TranslatePress
- Translate your WooCommerce store using WPML
The first way : using TranslatePress to translating your WooCommerce store
TranslatePress is the best translation plugin for WordPress . It allows you to easily translate the text on your site through a point-and-click interface.
First, you need to install and activate the TranslatePress plugin . For more details, see our step-by-step guide on how to install the WordPress plugin .
Note:
you can use the free version of TranslatePress to translate your site into another language. For unlimited languages, you need the Professional version of TranslatePress.
Upon activation, you will then need to install and activate the Extra languages add-on for TranslatePress. Just download this from your TranslatePress account.
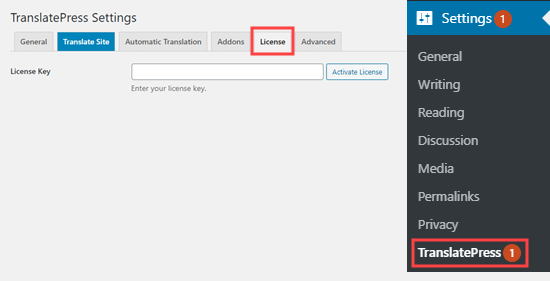
After activating the Extra languages add-on, go to the settings page “TranslatePress in your WordPress administrator. Here, you need to click on the “license” tab to enter your license key.
You will find your license key in your account area on the TranslatePress website. Just copy and paste it into the box and then click the Activate license button.
After that, click on the General tab. Here , you need to check that your default language is set correctly. You also need to choose the additional language (s) to use in your store.
To add a language, select it from the drop-down list and then click the “Add” button next to it.
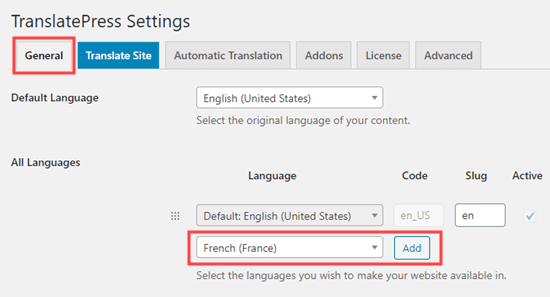
Go ahead and repeat this process for all the languages you want to use for your store.
You can also customize other settings here. For example, you can specify how the language selector will be displayed on your site. There are many different options to choose from.
Once the changes have been made, click the “Save Changes” button at the bottom of the screen.

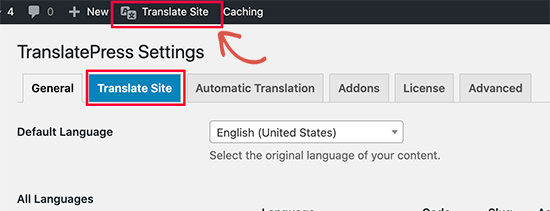
Now that you have configured the basic settings, let’s start translating your WooCommerce store.
Just click on the subtitle Location tab at the top to launch the subtitle editor.
The translation editor of TranslatePress will display a live preview of your site on the right and the translation panel in the left column.
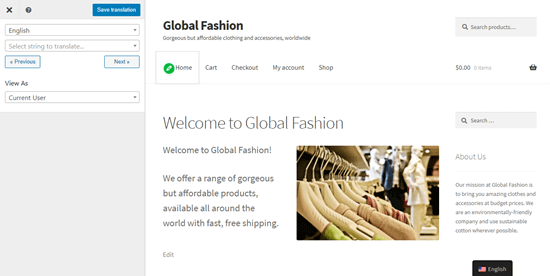
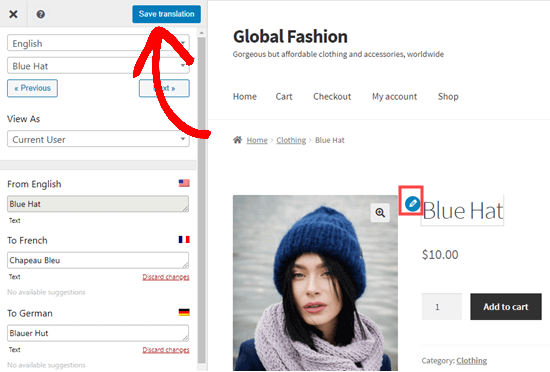
Go ahead and click on any links here to go to different pages of your site. In the preview panel, you can simply move the mouse to the text you want to translate and then click on the blue pencil icon to edit it.
You will then see the translation pane on the left side of the screen. and can simply write translations here for this text. You can do this for any or all of the languages of your site.
Once you’re done, don’t forget to click the “save Translation” button at the top of the screen.
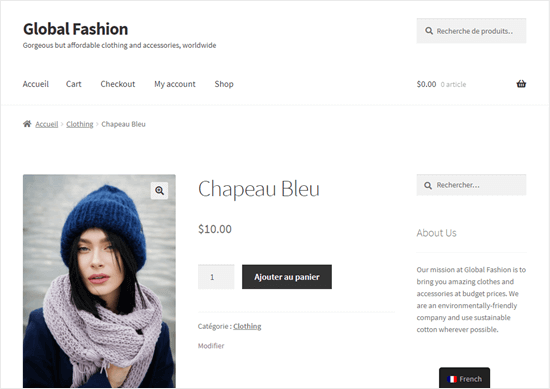
After that, go ahead and visit your website to see your translated product. Just click on the language converter and change it to the language you want.
The text generated automatically by WordPress and plugins should be translated automatically.
Note:
you can create your own translation of this text if you want. The text created by WordPress or plug-ins is displayed with a green pencil icon in the TranslatePress translation editor.
You can continue translating the rest of the WooCommerce product page and the text of your site in the translation editor.
Note:
you can also translate your website automatically using TranslatePress and Google Translate. To do this, you need to create a Google Cloud account and set up an API key.
To set up automatic translations, go to the settings “TranslatePress” automatic translation page. You need to select Yes to” enable automatic translation ” and then fill in the Google translation API key.
If you do not want to go through the process of creating an API key, you can use the translation from Google manually. To do this, simply copy sections of the text to Google Translate and then paste the translation into the translation editor.
For more help using TranslatePress, check out our article on translating your WooCommerce WordPress site using TranslatePress .
The second way: using WPML to translating your WooCommerce store
The WPML extension is popular for the distinctive translation of the WordPress program. It has a user-friendly interface, allows you to connect your site to third-party translation providers, and can also provide automated machine translation.
First, you need to register for an account on the WPML website. You will need a multilingual CMS plan to translate WooCommerce.
Next, you need to install and activate the WPML extension . For more details, see our step-by-step guide on how to install the WordPress plugin .
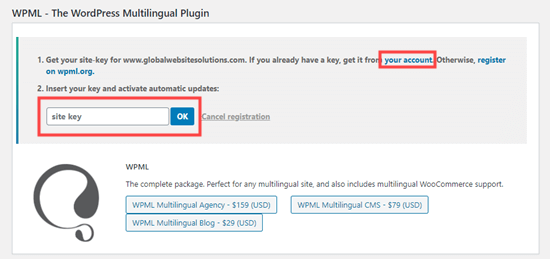
When activated, click on the “Register Now” link that you will see on your accessories page. Next, you need to enter your location key. You will find this in your account on the WPML website .
Next, go to the extensions” add new ” business page .
Here, it is easy to install other WPML extensions that you need. These are:
- String Translation
- Translation Management
- Media Translation
- WooCommerce Multilingual
Just check out these four additions to the list.
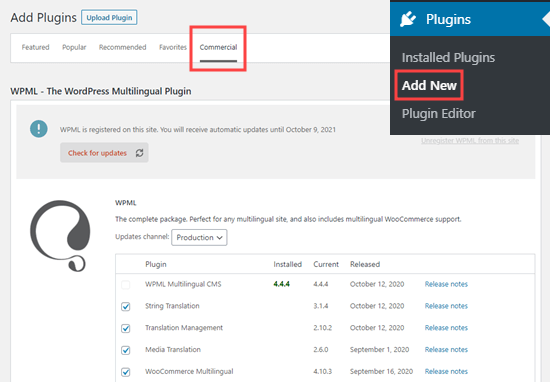
Then scroll down and check the “activation after download”box. After that, go ahead and click the Download button. Additional add-ons will be downloaded, installed and activated automatically for you.

You should see the “operation completed”message.
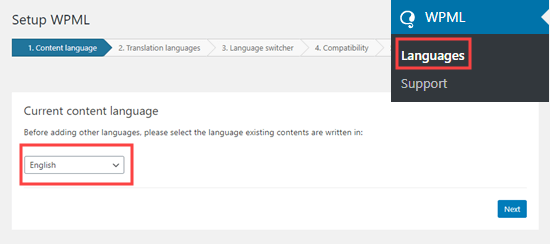
Now, go to the WPML ” languages page in your WordPress admin. This will display the WPML setup options.
You need to select the language of your current content, and then click the “next”button.
Now it’s time to choose which languages you want to enable for your site. Just check the box next to the ones you want to use.
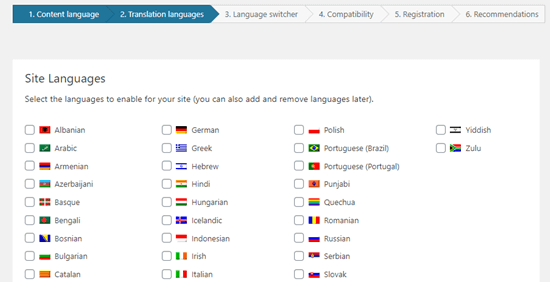
Language options will appear on your site in the language converter.
WPML will ask you to choose a request for languages. You also need to choose what to do if a translation of a particular page or product is lost.
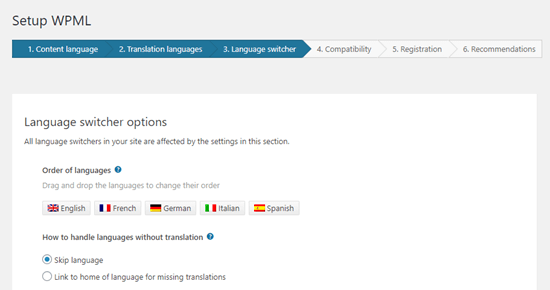
Below this, you can add the language converter to your navigation menu. Alternatively, you can add it to a widget or the footer area of your website.
Finally, you have the option of linking subtitles at the top or bottom of your content. If you enable this option, you can choose what these subtitle links will look like. You will also see a preview.
Note:
this text will appear with the description of your product and on the pages of your site, and not just in blog posts. You can change the text to” this content is also available in the language ” or similar.
![]()
When you are ready, click the “next” button to proceed.
WPML will then ask you if you want to send information about themes and extensions to WPML.org. this can help speed things up if you need support.
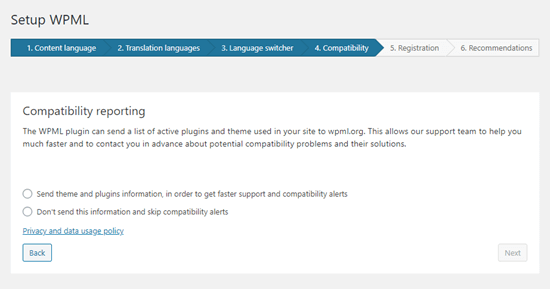
After that, you need to enter your location key if you have not done this before. If you have already entered it, just click the “next”button.
After that, you will see some recommendations for installing other add-ons. If you have not already installed and activated additional WPML extensions in advance, you can do this here.
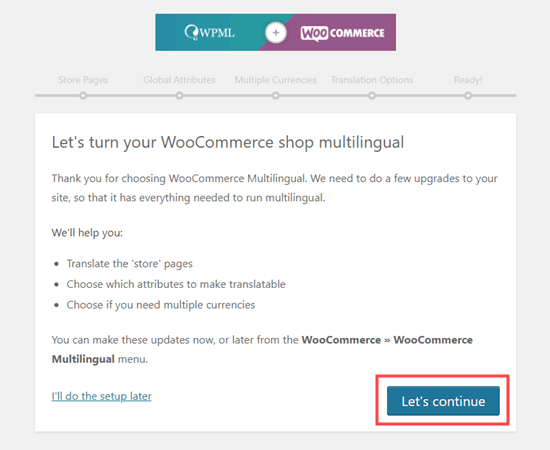
Then click on the “skip and finish” link to close the SetUp wizard.
You should now see the WooCommerce Multilingual setup wizard. Just click the “LeT’s Continue” button to start setting up WooCommerce store subtitles.
First, you will be asked to create missing subtitles for your store pages. Just leave the “Create missing translations” box checked and click to continue.
![]()
In the “general Themes” tab, just click the “Continue”button.
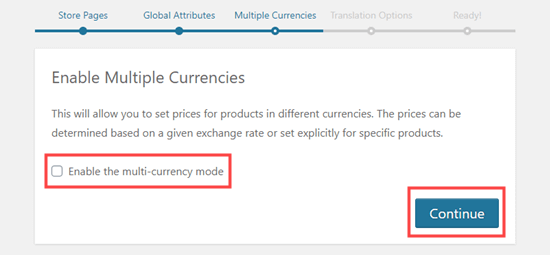
WPML will ask you if you want to enable multiple currencies. If you have done this, check the “enable multi-currency mode” box before clicking the “Continue”button.
Under translation options, WPML will ask you if you want to display products even if they are not translated. Choose the option you prefer and then click the “Continue”button
![]()
On the next tab, just go ahead and click the “close setup”button.
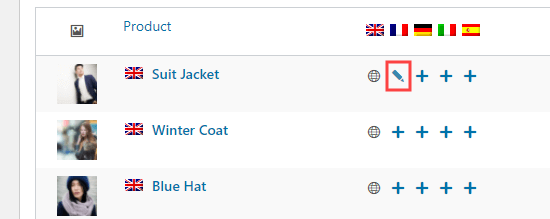
After that, go to the WooCommerce ” WooCommerce Multilingual tab in your WordPress administrator. You should see your product list in the product table. There will be a new Column displaying the languages you selected when setting up WPML.

To translate a page, just click on the + icon for your chosen language. You will then see the product translation screen. You can copy the fields from the original or simply write the translated text
![]()
Below this, you can also translate any other text of the product.
Once the translation is done, scroll to the bottom of the page. Here , you need to check the “translation completed” box and then click the “save and close”button.
Now, you will see your product list again. The + symbol of your translated product and language has turned into a pencil icon. You can click on this to edit the translation.
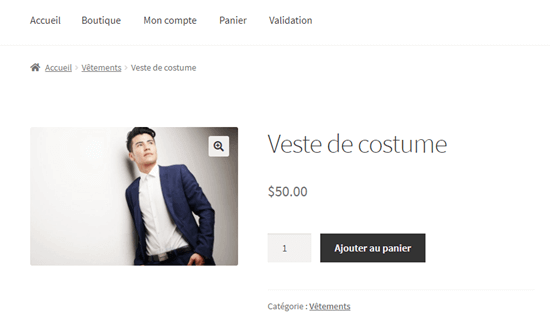
Now, you can go ahead and translate your product to other languages in the same way. We have translated the suit jacket product page into French, German, Italian and Spanish.
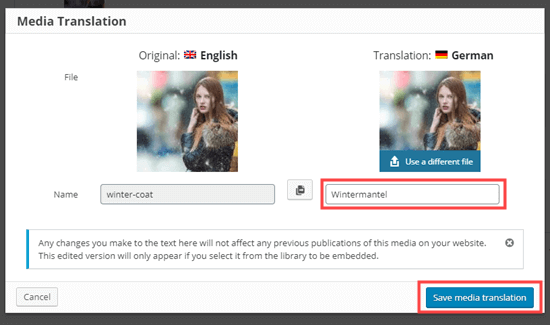
To add images to your translated pages, go to the WPML ” media translation page in your WordPress administrator.
Then, click the + icon for your chosen image. You will see a pop-up window where you just need to type the name of the image. You can also select a different image to use in the translated version.
When you are ready, click on the “Save media translation”button.
Tip: to translate your product categories, just click on the “Categories” tab and translate them in the same way as your products.
Once you have translated your product, users can view it in their own language on your website. WPML will automatically translate WordPress-generated text such as” add to cart ” into the user’s language as well.
Automatically translate the WooCommerce store using WPML
If you do not want to create subtitles yourself, there are many other options.
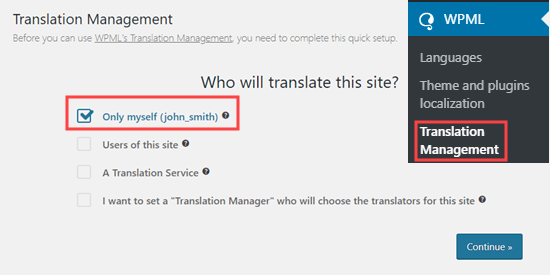
You can add other users as translators, use a translation service, or translate content automatically. To do this, just go to WPML “manage translation in your WordPress dashboard.
First, you need to run the SetUp wizard. This allows you to choose who will translate your site. If you want to allow other users to translate content, or if you want to use a translation service, you can do it here.
We will only use machine translation on our website.
After that, you will see some details about the advanced translation editor. Simply click to continue. You will then see a summary , where you just need
to go ahead and click the button “done!”Button.
After that, you will be taken to your translation management dashboard.
Here, you need to click on the “translation tools” tab and then the “register for free” button to set up automatic translations.
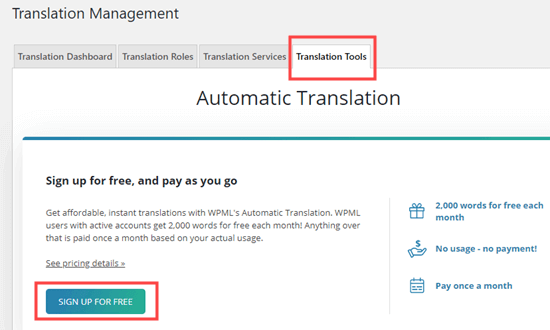
Tip:
you get 2000 words / month of machine translation for free.
You will then be asked to enter your billing details.
Once this is done, click on the “translation Dashboard”tab. Here, you need to select all the items to translate them automatically.
First, you need to select “product” from the Content Type drop-down list, and then click the “filter” button to view only your products.
After that, just go ahead and check the box next to your chosen items. You need to check the box to translate the image as well.
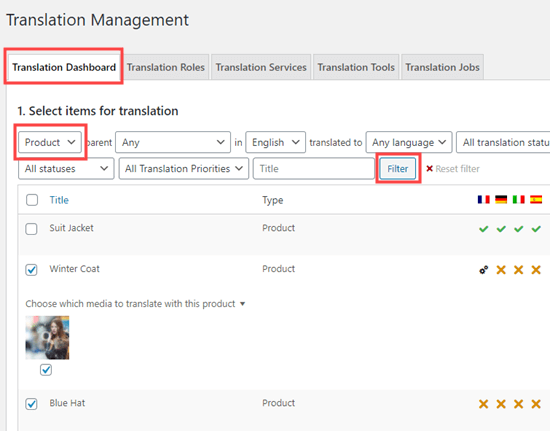
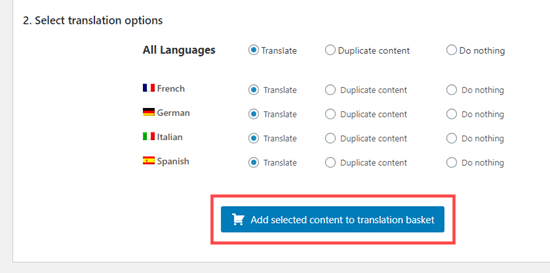
Below, select the languages to which you want to translate your products. This will default to all languages. Then, just click on the “Add selected content to the translation basket”button.
You will now see the new translation basket tab. Go ahead and click on this. After that, check that the content you want to translate automatically is inserted correctly here. Once you have done this, just click on the “send all items for Translation”button.
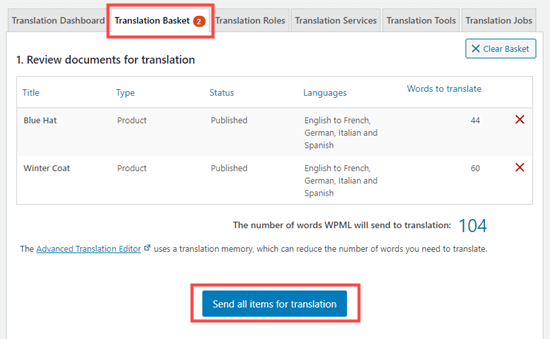
Your content will be prepared and submitted. You will see a pop-up window informing you that media files have been sent for translation. Just click “Continue” here.
Now, just click on the translation tools tab and translate your content automatically.
After that, select everything you want to translate and then click the “translate automatically”button.
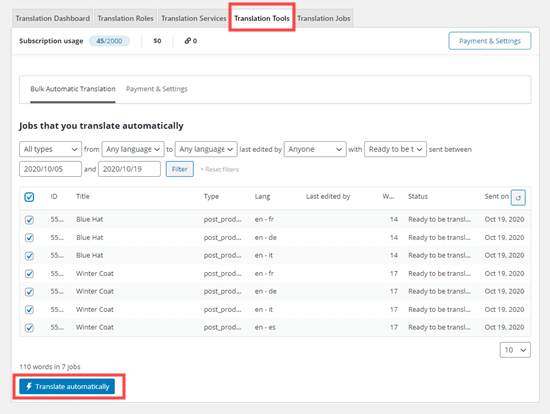
Now you will see a message informing you that jobs have been added to the translation queue.
You can click on the translation tasks tab to check that your translations are complete. To edit any of the machine translations, use the WooCommerce “WooCommerce Multilingual” page .
Translated pages are already on your site too.
Now you can visit the WooCommerce store to see the translated pages.
We hope this article helped you learn how to translating your WooCommerce .