
How to customize your WordPress header ?
Do you want to display a custom header for your WordPress site or customize it ?
Many WordPress themes come with an embedded header located at the top of each page. You may need to customize it to add important links, social icons, site search, or other elements to make a good first impression.
In this article, we will explain how to customize your WordPress header and even create a completely custom header for your entire site or specific pages.
What is the Header in WordPress ?
The header of your website is the top section of every page on your WordPress site and is often the first thing your visitors see.
It typically displays your site’s logo, title, navigation menus, and other important elements you want users to see first.
By customizing your website’s header, you can give it a unique design and make it more useful to visitors. You can link to your most popular pages, display social icons or your business phone number, and showcase call-to-action buttons for further conversions.
Let’s take a look at how to easily customize your WordPress header.
Customizing the Header using Custom WordPress Templates
Many popular WordPress themes allow you to use the WordPress theme customization tool to make changes to your WordPress header area. This feature is sometimes called the custom header, but not all themes support it.
You should start by going to “Appearance” and then click on “Customize” in your WordPress admin area.
Note: If you don’t see “Appearance” and only see “Appearance > Editor (Experimental)” in your WordPress admin, it means that your theme has enabled full-site editing. In this case, you should proceed to the next section.
Your theme may add a “Header” section to the customization tool, or add Header options under the “Colors” section, but this varies from theme to theme. Here are some examples:
Some themes, like Twenty-One, don’t offer any header customization options at all. In this case, we recommend using a drag-and-drop theme builder plugin like SeedProd.
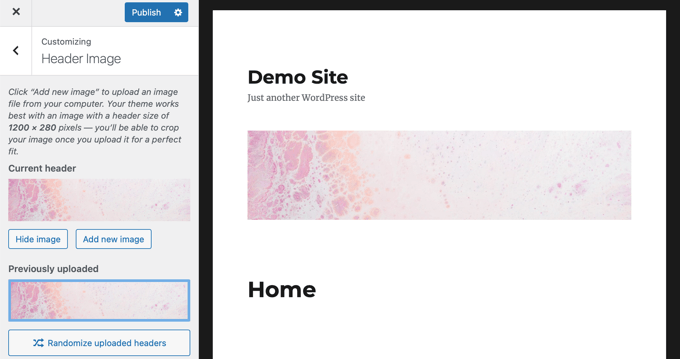
The Twenty Sixteen theme allows you to add a background image to the header or even add random header images.
Some free and premium WordPress themes offer more theme customization options.
For example, you may be able to change the Header’s font style, layout, colors, and much more. But you are limited to what the theme developer allows you to do.
For example, you can create a custom Header using the Theme customizer with the Astra theme.
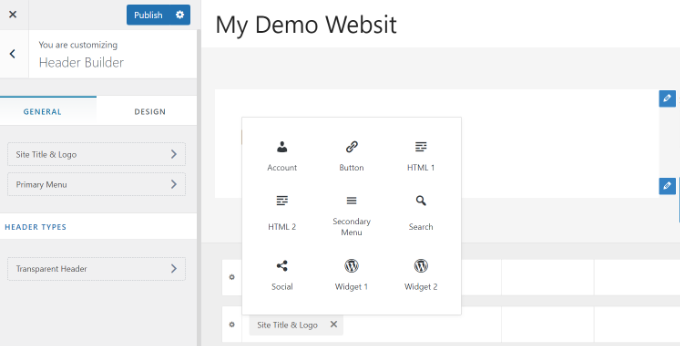
Astra has a dedicated “Header Builder” option in the panel to your left. Here you will find various settings to modify the appearance and style of the header.
You can create a custom header by adding blocks, just like when editing a blog post or page in the WordPress content editor.
To get started,
Simply hover over an empty area in the Header and click the ‘+’ symbol to add a Header block.
![]()
Then, you can select which block you want to add to your custom header.
For example, you can add widget block, account block, search block, and more.
In addition, the Header builder also allows you to drag and drop blocks and place them above or below the Header.
You can also customize each block you add to the header.
For example, selecting a site title and logo block gives you options to upload a site title and logo, change logo width, display site title text, and more.
Additionally, you can change the background color of the header or add a background image to appear in the header.
When you finish customizing the custom header, simply click the “Publish” button.
Customizing the Header using the WordPress Site Editor
WordPress introduced full-site editing to WordPress in version 6.0. If your theme supports this new feature, it replaces the theme customization tool. However, currently, there are only a few themes that work with the full-site editor.
When using a compatible theme, you can customize the header of your page by going to “Appearance” and then clicking on “Site Editor”. This will launch the full-site editor, which closely resembles the block editor you use to write WordPress posts and pages.
When you click on the header, you will notice that the template name at the top of the page changes to “Header page”.
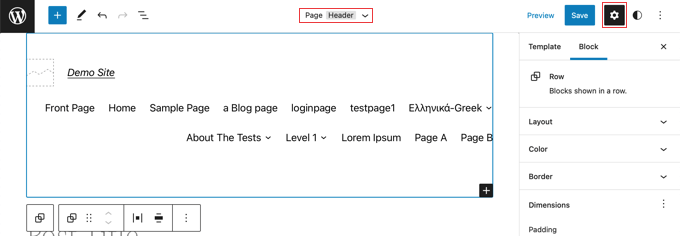
Now when you click the Settings icon on the toolbar, you’ll see options to customize the title’s layout, color, borders, and dimensions.
As an example, we’ll change the background color of the Header.
First, you need to click on the “Color” section to expand it. After that, you should click on the “Background” option.
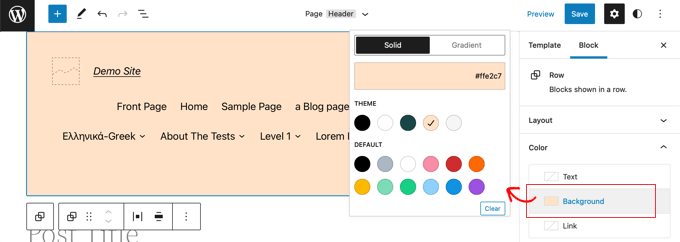
A popup will appear allowing you to select a solid color or a gradient.
There will also be a number of colors that you can select. When you click on one of the colors, the background of your title will be changed instantly.
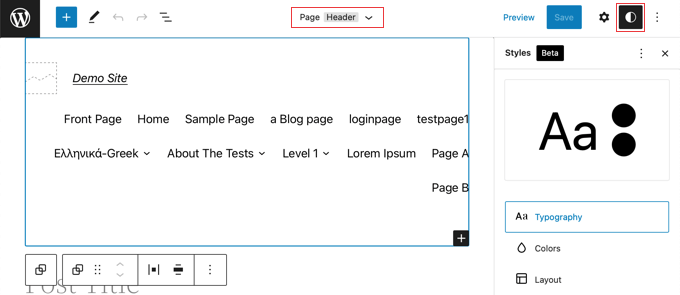
You can find more customization options by clicking the “Styles” icon at the top left of the page.
This will allow you to change the font, colors, and layout of the header.
Create custom header and page layouts with SeedProd
If you want to have complete control over your Headers, Footes and Sidebars to give your website a unique design, we recommend SeedProd.
SeedProd is the best WordPress theme builder plugin that allows you to easily create a custom WordPress theme without writing any code.
This includes creating headers, footers, and everything else needed for an attractive WordPress theme.
You can also create multiple custom Header styles for different pages and sections of your website.
Note :
You can use the free version of SeedProd to create custom landing pages including custom headers, but you will need the Pro version to create fully custom themes that include site-wide Header layouts.
All you have to do is click on the Edit Design link below the title.
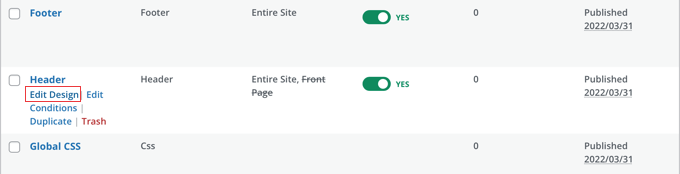
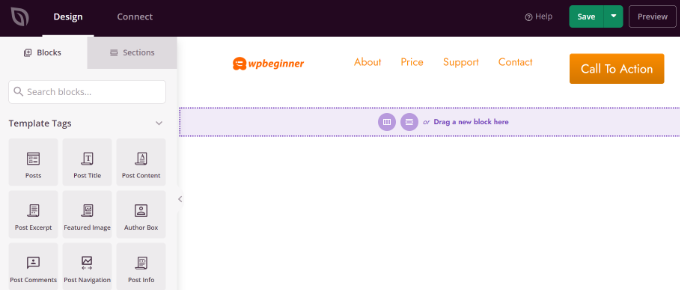
This will open the Header in SeedProd’s drag-and-drop editor .
From here, you can easily customize Header by adding new blocks .
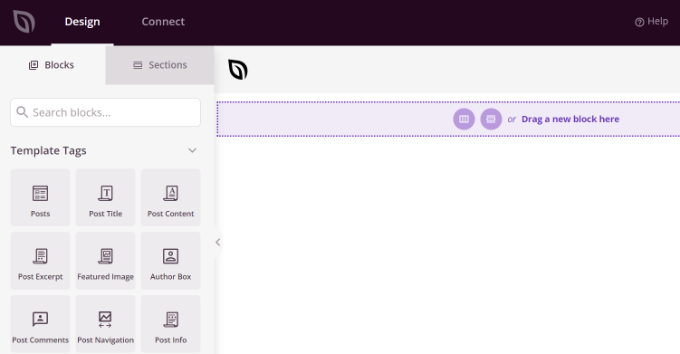
There are blocks for template tags like the site logo and any of your WordPress widgets and advanced blocks like a countdown timer, navigation menu or social sharing buttons.
The best part is that you can further customize each block with the theme builder.
For example, you can change the size and alignment of your logo or choose which pages to display in the navigation menu .
It even allows you to add an image in the title .
With SeedProd, you can also add an entire section to your theme header template .
Sections are a group of blocks, and you can use them for different areas of your website.
This includes headers, footers, highlights, testimonials, a call to action, and more.
To use a Header section, first switch to the Sections tab in the build panel.
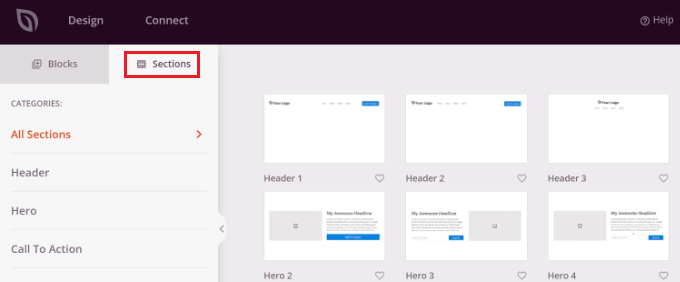
Next, choose the Header section you would like to use for your website. SeedProd offers multiple section templates that you can use.
After that, go ahead and customize the Header section .
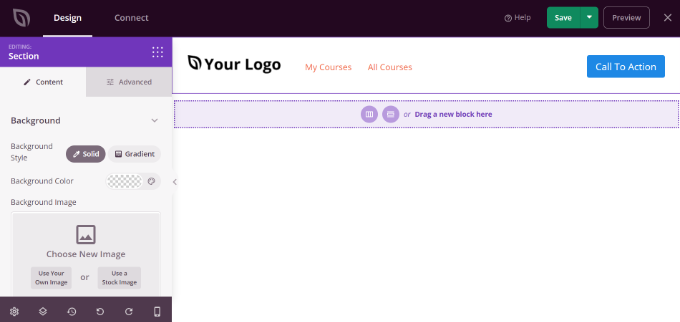
Once you are satisfied with your custom Header, be sure to click the Save button to store your changes.
Now, you are ready to publish your custom Header.
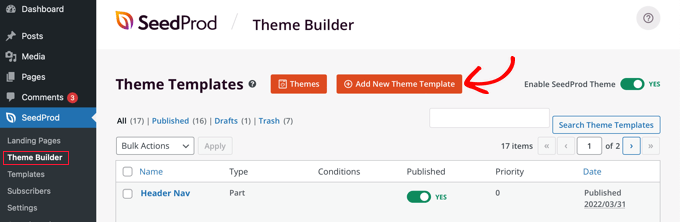
Simply go to the SeedProd » Theme Builder page from your WordPress dashboard and click the toggle button next to the ‘Enable SeedProd Theme‘ option to ‘Yes‘.
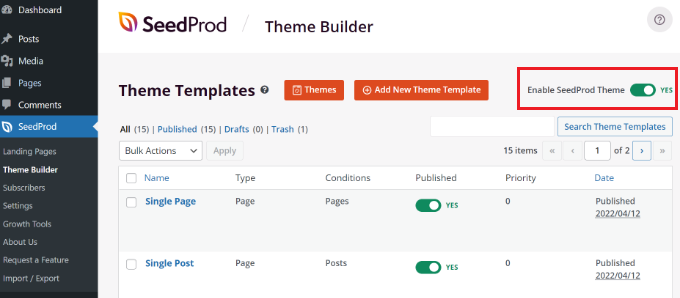
Once the option is enabled, SeedProd will replace your default WordPress theme with a new custom theme and header.
You can now visit your website to see your new custom Header in action.
Create different custom headers for each page
Did you know that with SeedProd you can create custom Headers for different pages ?
The theme builder allows you to add custom headers for every page on your WordPress site .
This way, you can show a custom header for various categories, tags, post types, page types, and more.
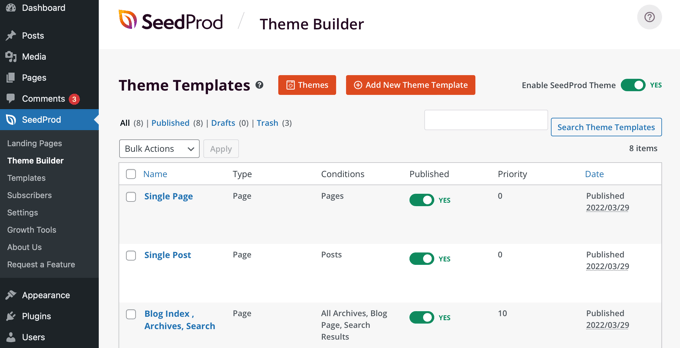
To get started, you will need to go to SeedProd » Theme Builder from your WordPress dashboard and click on the “Add New Theme Template” button .
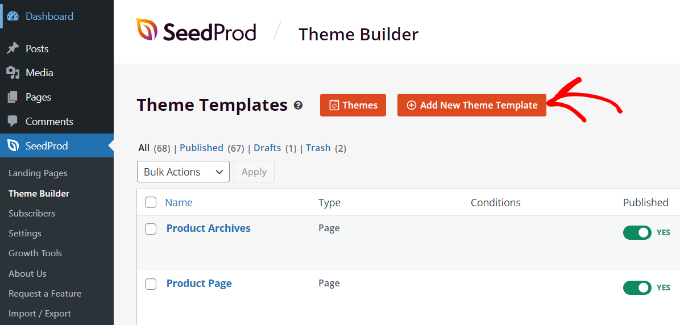
A new popup will appear where you will need to enter your theme template details .
Go ahead and enter a name for your theme template .
Next, choose “Header” as the template type from the dropdown menu. You can leave the Priority field blank.
Next, you will need to enter the conditions for the custom header offer .
For example, we used the terms where it will appear on all posts and pages in the Tutorials category .

Don’t forget to click the Save button when you’re done .
Then, you can go ahead and edit your custom Header using SeedProd’s drag and drop theme builder .
When you’re done editing your custom Header, just click the Save button at the top.
Add a custom header for each category
Most websites display the same Header on all posts, pages, categories, and archive pages.
However, you can display a different Header for each WordPress category.
This can be done by adding code to your theme files, but you’ll have more control with the theme builder.
We previously showed you how to customize the Header using the SeedProd theme builder plugin .
SeedProd also allows you to create multiple custom Headers and display them for different classes using conditional logic .
To create a new Header, you need to go to SeedProd » Theme Builder and click on the orange “Add New Theme Template” button.
Alternatively, you can duplicate the existing Header and use it as a starting point.
A popup will be displayed where you can name your theme template and choose “Header” from the “Type” dropdown.
You also need to enter a priority. This option is used if more than one Header meets the conditions for a particular page, the header with the highest priority will be displayed.
The default address priority is 0, so be sure to enter 1 or higher.
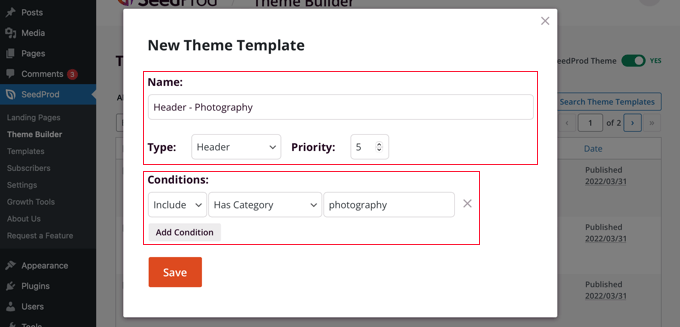
Next, you’ll need to set up one or more conditions.
This lets SeedProd know when a particular Header has been displayed.
You can simply select conditions from the dropdown lists. In the first two lists, you need to select “Include” and then “Have Category”.
In the last field, you have to type the name of the class where you want to display Header.
You can easily display the same title for multiple categories by clicking the Add Condition button and including another category.
When done, be sure to click the Save button to save your new Header.
You can now customize the design of each new Header using SeedProd’s drag and drop editor as we showed you earlier.
Add a widget area to your WordPress Header
If you are creating a custom theme from scratch using code, you may be looking to add a WordPress widget to your header to catch the attention of your visitors.
Widgets allow you to easily add content blocks to specific sections of your theme, but not every theme includes a Header widget area .
We mentioned earlier how easy it is to add widgets to Header using the SeedProd theme builder.
But what if you want to add a widget to your regular WordPress theme Header ?
Some themes, such as the Astra theme, allow you to do this using the WordPress theme customizer.
For example, Astra adds an option called “Header Builder” that lets you fully customize the header, including adding widgets.
If your WordPress theme does not currently have a WordPress widget area in the Header, you will need to add it manually by adding the following code to your function.php file.
This is a more advanced option, as you’ll need to know where to put the code and how to style it with CSS.
|
1 2 3 4 5 6 7 8 9 |
function wpb_widgets_init() { register_sidebar( array( 'name' => 'Custom Header Widget Area', 'id' => 'custom-header-widget', 'before_widget' => '<div class="chw-widget">', 'after_widget' => '</div>', 'before_title' => '<h2 class="chw-title">', 'after_title' => '</h2>', ) ); } add_action( 'widgets_init', 'wpb_widgets_init' ); |
This code registers a new sidebar or widget-ready area for your theme.
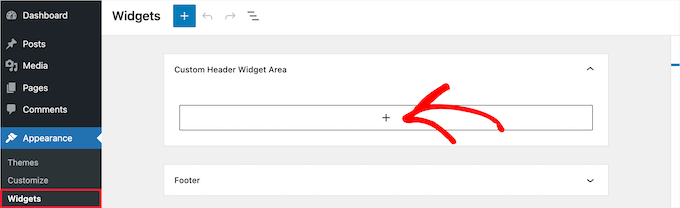
If you go to Appearance » Widgets, you will see a new widget area called “Custom Header Widget Area”. N
ow, you can add your tools to this new area.
Finally, you need to add some code to your template header located in your theme’s header.php file. This will add the widget area you created earlier to your Header so that widgets will be displayed on your website.
You need to copy and paste this code snippet where you want to display the widget.
|
1 2 3 4 5 6 7 |
<?php if ( is_active_sidebar( 'custom-header-widget' ) ) : ?> <div id="header-widget-area" class="chw-widget-area widget-area" role="complementary"> <?php dynamic_sidebar( 'custom-header-widget' ); ?> </div> <?php endif; ?> |
Depending on your theme, you may also need to add CSS to WordPress to control how the widget area is displayed.
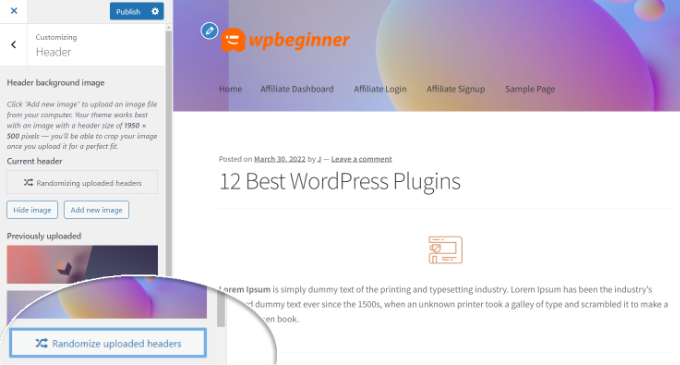
Add random header images to your WordPress blog
Another way you can make your WordPress Header more attractive is to add random images to the Header section.
Displaying randomly changed images helps grab the attention of your visitors and make your content more engaging.
To add random header images to your WordPress blog, you can use the theme customizer and upload the images to the header section.
This option may vary depending on the WordPress theme you are using.
Next, select the “Randomize uploaded headers” option.
If you want more control and flexibility over displaying random images in the Header section, you can also use a WordPress plugin.
Add a symbol to your website address (Advanced)
Finally, if you would like to add a custom icon to the Header section of your website, you can do so easily from your WordPress dashboard.
This method is recommended for advanced users and is not suitable for beginners as it involves editing code and requires technical knowledge.
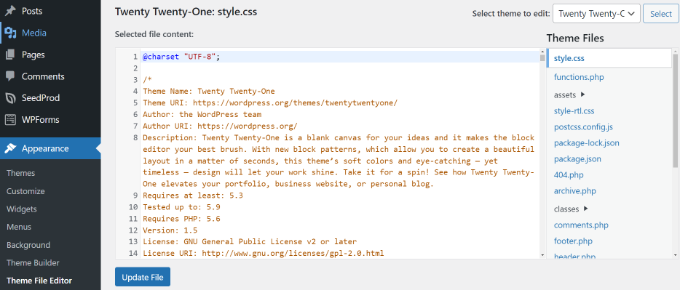
You can find your theme’s header files by going to Appearance » Theme File Editor from the WordPress admin panel.
In the “style.css” theme files, you can scroll down to the Location Header section and add or remove code.
Note :
We do not recommend editing theme files directly because the slightest mistake can break your website and disrupt the design.
The easiest way to add custom code to edit your site’s Header is to use the Insert Headers and Footers plugin.
First, install and activate the Insert Headers and Footers plugin.
Upon activation, you can go to Settings » Insert Headers and Footers from your WordPress dashboard.
Next, enter the custom code in the “Scripts in Header” section.
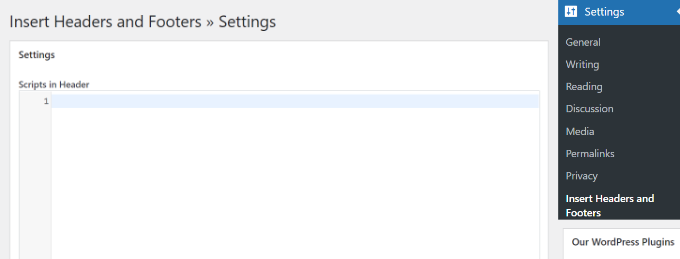
After entering the code, save the changes.
We hope this tutorial helped you learn how to customize your WordPress header.