

Are you interested in building a great website by Elementor ? In this article we will provide how to use Elementor
Well, there is good news … Now it’s easier than ever! There is no need to manually mark up each page from scratch or hire a team of professionals.
These days, all you really need is a plugin called Elementor . It is one of the most versatile and accessible WordPress page builders on the market.
Even better, it’s completely free to get started!
In this Elementor tutorial, we will cover how to use Elementor step by step and learn about some of its best features.
In the end , you should have everything you need to create a WordPress website that impresses, in no time!
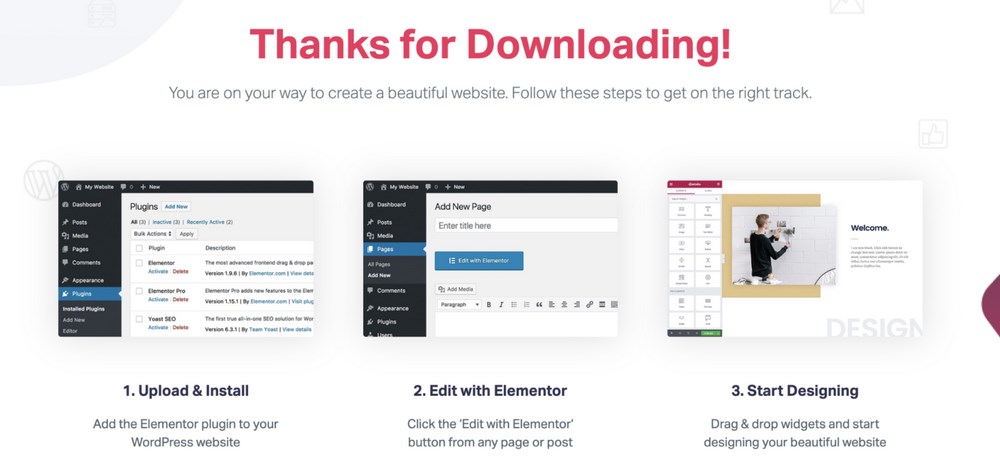
1.Installing Elementor in WordPress
Elementor is a popular page builder that pairs well with lightweight WordPress themes like Astra . This page builder allows you to control every aspect of the appearance and layout of the pages and publications of your website, with dozens of tools that add functionality through a clean drag-and-drop interface.
Now, keep in mind that Elementor itself is not a WordPress theme – it’s a plugin. This is important because you will still need to choose a custom theme to handle other aspects of your website.
Once you have installed WordPress and a chosen theme for your site, there are a few different ways you can go about installing the Elementor page builder:
Method 1: Elementor website.
Visit the Elementor website and get the free version of Elementor. The Download button is prominently displayed at the top of the main page.
As soon as you enter your email, your browser will automatically download the ZIP file.
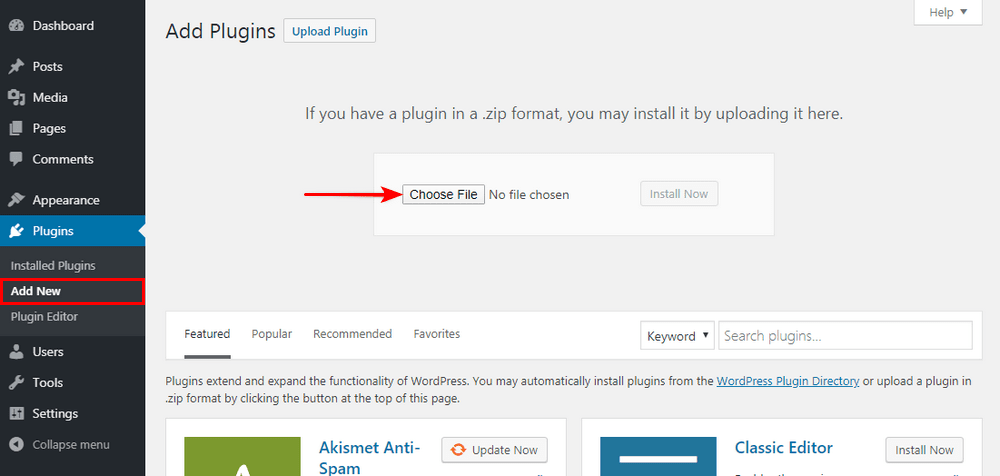
After that, go to the Extensions section at the back end of your WordPress site, click “Add New”, upload the ZIP file to your website via the “download plugin” button at the top.
Once installed, just click on “Activate” and it will be ready to go!
Method 2: WordPress control panel
Log in to the back end of your WordPress site and get ready to installadd by pressing the “add new” button from the Extensions tab.
To find Elementor, just type the word “Elementor” in the plugin’s search bar.
Elementor Page Builder should appear directly as an Add-On option to install it.
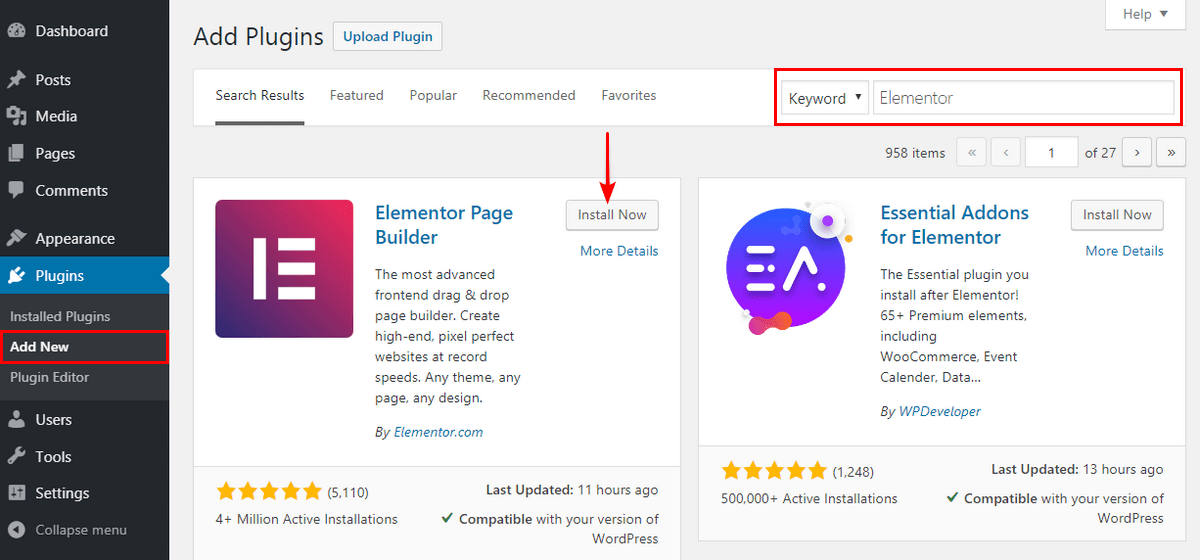
Just click “Install” and then “activate” once downloaded.
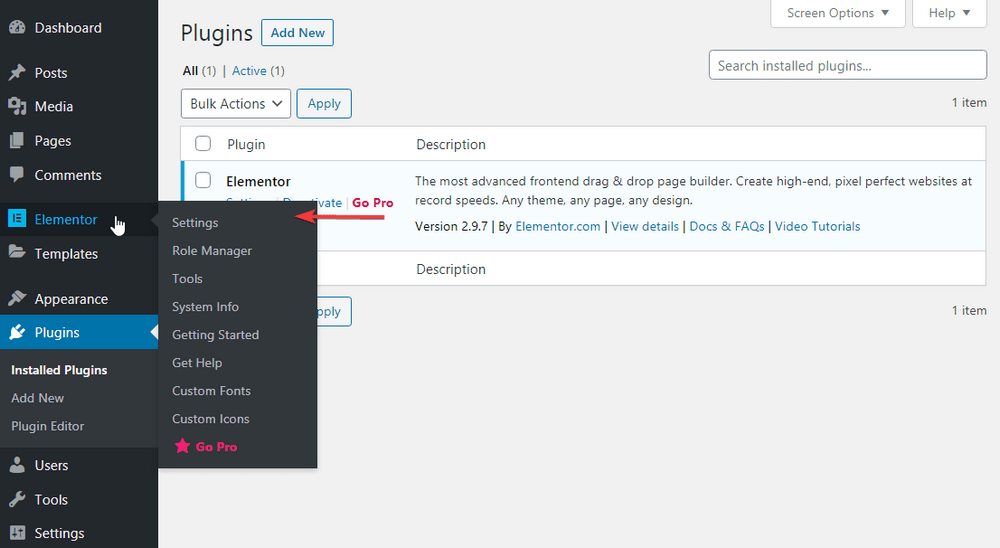
Whichever method you choose to install Elementor, you will be able to find it in the plug – ins menu”from now on-and it will also have its own entry in the side menu.
From this area, you will be able to adjust the extension settings.
Unlike many plugins, the greatest functionality of Elementor takes place on the pages themselves.
This means that you will spend most of your time using Elementor when you are creating or editing pages and posts.
2. Explore item options
We’ll take a look at creating our own pages and templates using Elementor soon, but first, let’s take a high-level look at the options you have with Elementor!
One of the most important features of any page builder is ease of use. You should be able to jump in and make your vision a reality without a lot of frantic searches on YouTube.
Fortunately, Elementor is one of the easiest page builders we’ve ever used. It is a front-end Editor, which means that you can see exactly how the page will look as you work on it.
Once you get used to the workflow of dragging tools to the page and modifying properties in the sidebar, you will realize that it is as intuitive as possible.
Most of the customization options you will find in Elementor are based on the widgets that come with the plugin.
Item settings
Elementor has a few top-level settings that you can find directly in the extension. This allows you to do things like check the types of posts that Elementor works with, set the default font and spacing, and adjust the response settings.
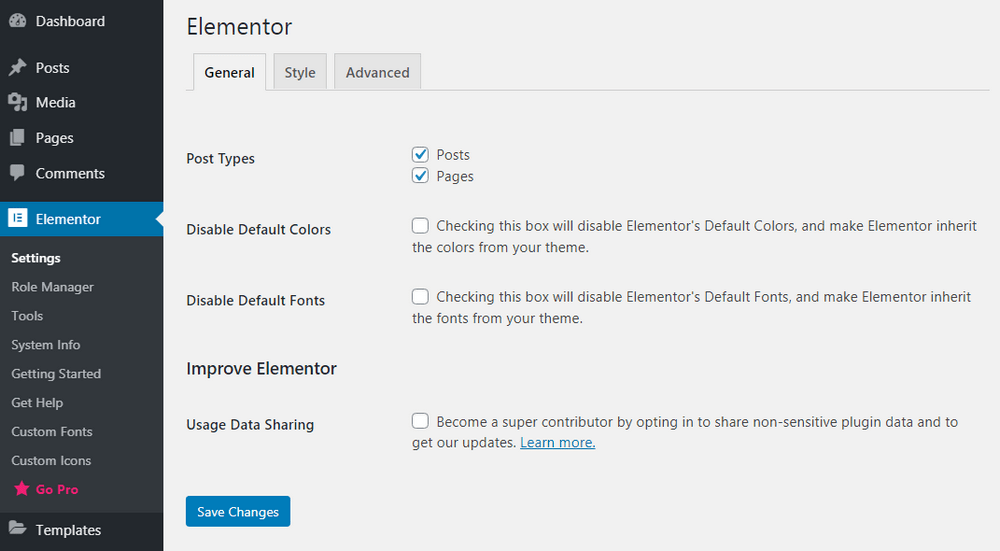
There is also a useful role Manager function in Elementor that allows you to classify the types of users who have access to the Editor (Note: This is a feature only in Elementor Pro ).
What widgets are included
In general, Elementor is based on a drag-and-drop editor that fits into sections, columns, and widgets.
The system was divided as follows :
- Partitions-containers for columns and UI elements.
- Columns-sections that contain widgets.
- Widgets-individual elements on the page.
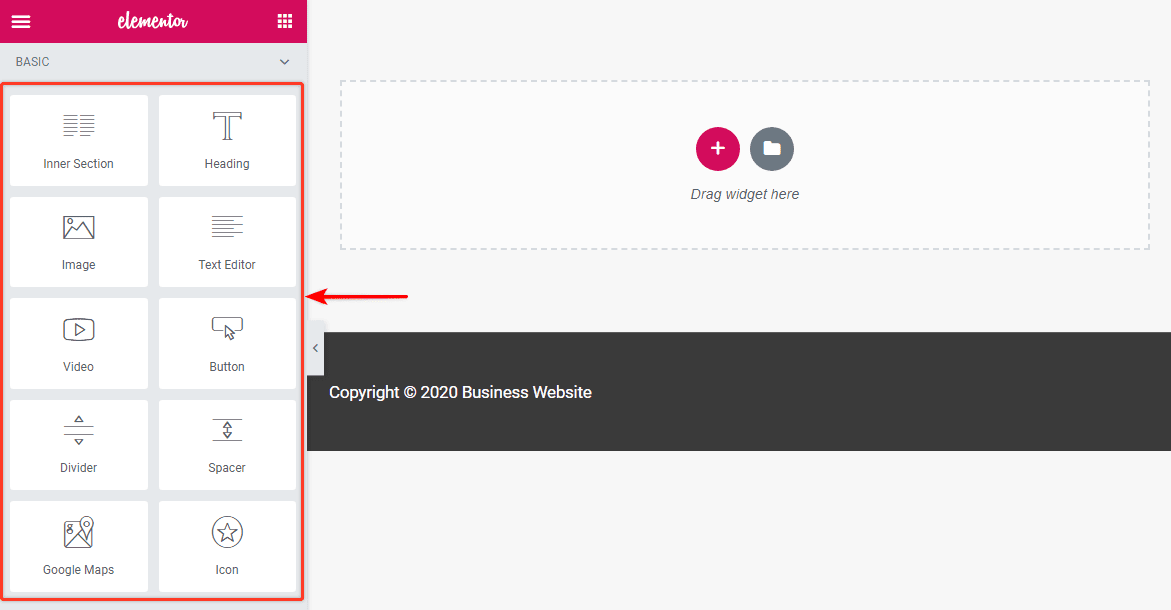
These tools are simple categories of content that allow you to customize your web page. In the free version of Elementor, you get access to the basic elements.
Here is a quick list of several basic tools that you will use a lot :
- Title
- Image
- Text editor
- Video
- Button
- Divider
- Icon
- Interval
- Google Maps
You get almost 30 essential elements that provide you with everything you need to create a functional web page.
Just drag an instance of an item to the main page and customize it according to your needs.
If these basic elements are not enough, it is possible to get additional tools by upgrading to Elementor Pro .
However, we would argue that most of what you can do in Pro is possible in the free version – it takes much longer.
It’s up to you whether you need the premium widgets that are in the Pro version.
Here’s a quick sample of the dozens of tools in Elementor Pro:
- File
- Application form
- Face box
- Price schedule
- Blockquote
- Call to action
These Pro elements will help make your site look neat and more professional, and are also designed to support e-commerce efforts, including in-depth integration with WooCommerce.
Finally, Elementor supports third-party tools.
You can find a lot of third-party use Elementor add-ons that further expand your available tools, or even develop your own widget using the development resources from Elementor!
Aren’t you sure you’d like to add additional widgets
While it may be convenient to have widgets for everything you want to do on your website, it is not absolutely necessary. There are still countless free third-party WordPress components that work well together with Elementor and your WordPress theme.
3. Use Elementor Free vs Use Elementor Pro
If you want a high-end free page builder with more full-fledged features than many paid options, Elementor is a great option!
With it, Elementor Pro adds many desirable features to speed up your workflow and give you more control over the appearance and functionality of your website.
Theme Builder extensions, premium tools and universal elements are welcome, but you definitely don’t need them to create a great website.
Item features comparison table
Here’s a quick overview of the main differences you’ll find between Elementor Free and Elementor Pro.
| free Elementor |
Elementor Pro | |
| price | free | It starts with 49 dollars per year per site |
| Number of items | 25+ | 50+ |
| page maker |
✓ | ✓ |
| Theme maker | X | ✓ |
| Includes round-the-clock support all days of the week | X | ✓ |
| Dynamic content | X | ✓ |
| Pro templates and blocks | X | ✓ |
| Integrals | X | ✓ |
Elementor Pro pricing
If you are thinking of getting one of the paid versions of Elementor Pro , you should note that all three plans offer exactly the same features!
The only difference between the Pro plans is the number of licenses you buy at once.
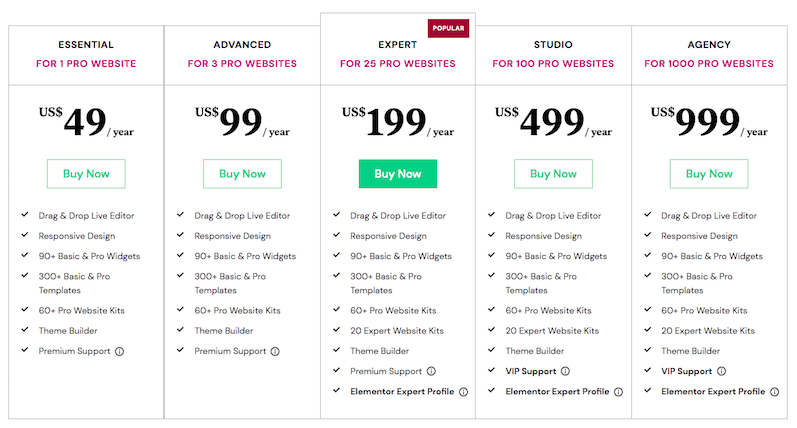
- With Essential, you get Elementor Pro for one website for 49 dollars a year.
- With Advanced, you get Elementor Pro on 3 sites for 99 dollars a year.
- With Expert, Elementor Pro you get 25 locations for 199 dollars a year.
- With Studio, Elementor Pro you get 100 sites for 499 dollars a year.
- With Agency, Elementor Pro you get a huge 1000 sites for 999 dollars a year.
Which one is right for you For individuals or small teams, Expert is definitely the best value, as long as it is likely that you will be managing more than one website with Elementor Pro next year.
You can always choose to start with Essential and upgrade to Advanced or Expert later if you decide you like Elementor and want more licenses.
4. How to use Elementor Free Page Builder?
So, with all that far away,are you ready to see use Elementor in action
This page builder works with custom post types and has a lot of ready-made templates to choose from, but for this post, let’s see what it’s like to start from the first box.
Step 1. Create a new post or page
Go to the control panel of your WordPress site and click “Add new” under posts or pages. In this tutorial, we will create a new blog post.
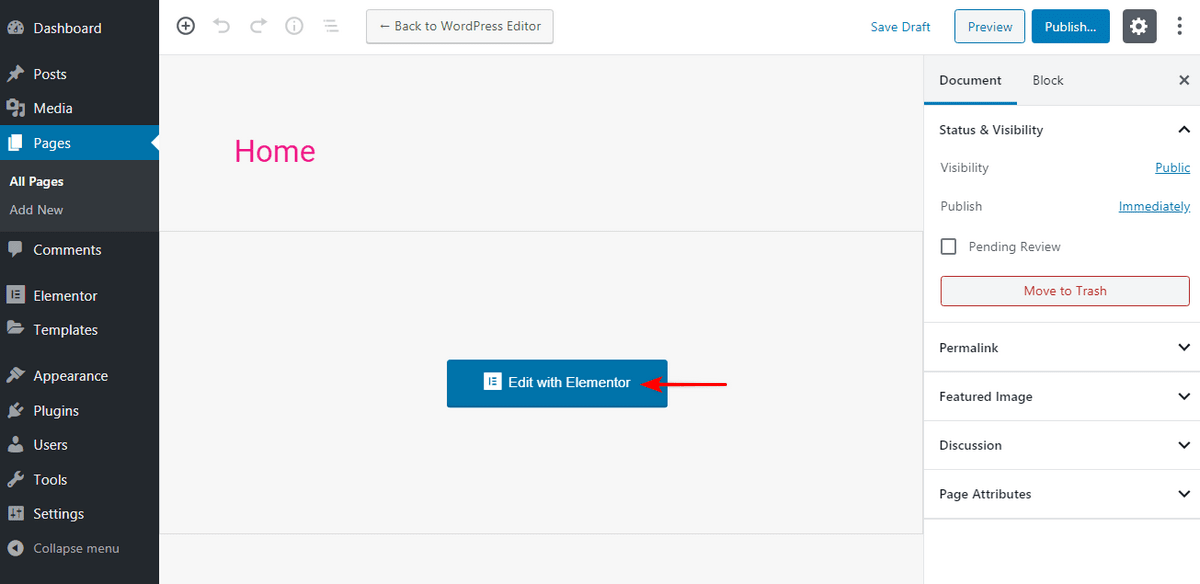
Step 2. Editing using Elementor
Once you reach this screen, you can choose to edit the page using the default WordPress editor. To use Elementor, you must click the ” Edit with Elementor “button.
Step 3. Drag items to the main page
This page will be blank at first. Select and drag items from the Elementor sidebar.
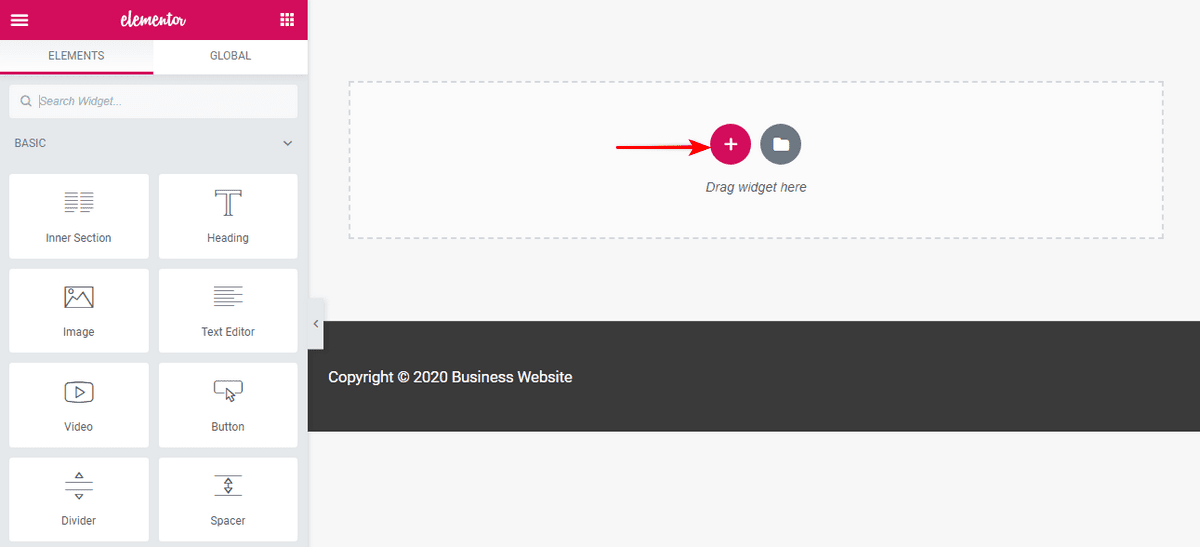
Let’s create a new title for the page. All you need to do is click on the box indicating the “title” and then holding down the mouse button, drag it to the widget area on the page (where the phrase ” drag the widget here “appears).
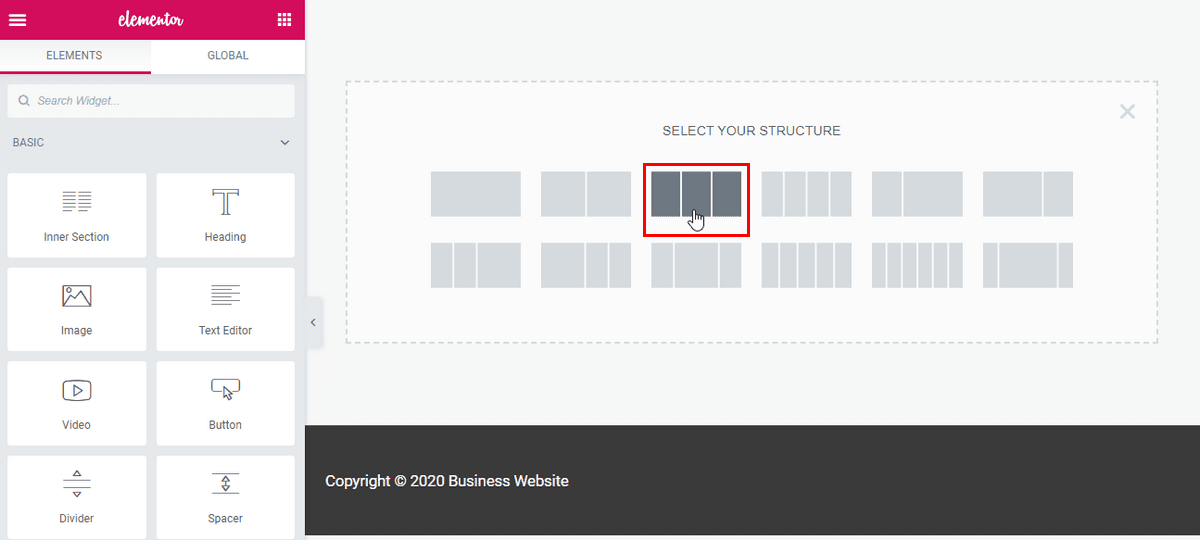
If you do not want this item to occupy the entire width of your page (which it does by default), you can click on the small button “plus – +” to customize the structure of this section of your page.
After clicking on the plus button, you will see the ” select your structure “option. Let’s start with three equal columns.
After clicking on this icon with the three columns, we now see a completely new section on the page with three columns, each of which has a plus button.
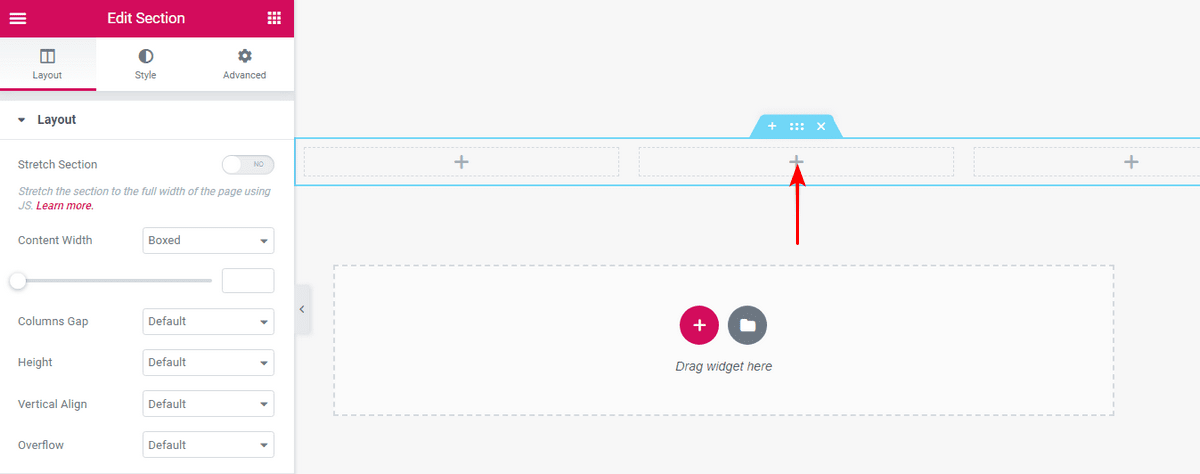
And if we want to customize what we see in this section You guessed it, we are dragging a tool there.
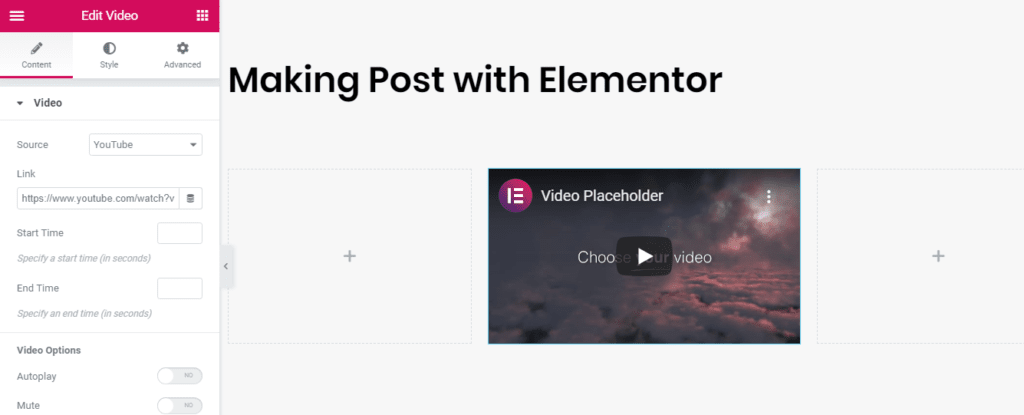
We dragged a video item to the middle column, which was previously loaded with the video playlist Elementor by default.
Step 4. Modify settings
For each section or item that you place on the page, you have options to customize it further. Just look for the six points.

If we specify the title, for example, we can change its content, style, advanced features such as margins, padding, responsiveness, etc.
Step 5. Publish your page
Once you are satisfied with the settings, it’s time to check the finished product.
We have seen how this page looks like in the editor, but if we take a peek at the preview of the actual page, we will see that it is the same!
This is a very good thing. That means that once the page you are working on is published, you can be confident that it looks exactly the same as it was while editing it. This is one of the most important features of use Elementor.
Summary of the page builder
Obviously, this is a quick example, but it shows you how easy it is to place items and create an effective website!
Bottom line, you don’t have to be an expert to create a website using Elementor. With a huge number of templates to choose from, you’ll never have to start from scratch unless you want to.
We highly recommend taking a look at Astra Theme, it has a lot of built-in Elementor templates called Starter Templates that you can use.
There is another big point that we want to emphasize here :
Whether you choose Elementor Free or Elementor Pro, the settings in the Elementor page builder are identical. Pro provides more advanced functionality through premium widgets to help you instantly with marketing, e-commerce, design and integration with other popular tools such as MailChimp and Adobe TypeKit.
It was a great decision to set up Elementor this way because you don’t have to relearn anything once you’re ready to make the leap from Elementor Free to Elementor Pro.
We will continue in the next article about the importance of Elementor in building pages and how to use it