

Want to create a professional business email address for free ?
Your work email address uses your company name instead of your general gmail, outlook, or yahoo account.
In this article, we’ll show you how to easily create a free business email address in less than 5 minutes.
What is a business email address and why do you need it ?
Your professional business email address contains your company’s custom domain name instead of your generic gmail or yahoo
account, for example : info@dr-wp.com Most beginners use generic free business email accounts without a domain name which is not very professional.
For example: abdullah@gmail.com or abdullah@yahoo.com.
Since these public email accounts can be created by anyone, it becomes difficult for customers and other companies to trust email addresses like legitimate business email accounts.
Here are the top 4 reasons why you need a professional email address for your business :
- A work email address looks more professional.
- It is also short and easy to remember.
- A professional business email address helps you gain your client’s trust as a legitimate business.
- Sending emails with your own domain name allows you to promote your brand with every email you send.
The best part is that you can get your business email address for free, which means there’s no excuse not to have one.
If you want your clients and other businesses to take you seriously, you need to start using a professional business email address right away .
What do you need to create a business email address ?
You’ll need a domain name and a website to create a free business email address.
Next, you will need an email service provider to handle your company emails.
There are a few different solutions you can use to create a professional email address for work.
We will show you two different methods, and you can choose the one that best suits your needs.
The first method is free and fairly easy to set up while the second method has a small fee, but it offers a lot of features.
Method 1: Create a free work email address
This method is easy and available to almost everyone who has a website. It allows you to create a business email address for free.
When creating a small business website, you will need to purchase a domain and sign up for web hosting.
What most beginners don’t know is that many WordPress hosting companies offer a free business email service as part of the package.
A domain name usually costs $14.99 per year, and website hosting starts at $7.99 per month.
If you are going to use a paid email service, you can add another $5 per email account.
Fortunately, Bluehost, one of the largest WordPress hosting companies in the world, has agreed to offer you a free domain name.
This means you can start your own business website for $2.75 per month (and it comes with a free business email address).
Here are the complete step-by-step instructions for creating a free work email address with Bluehost.
Step 1. Set up your business address (domain name)
First, you need to visit the Bluehost website and click on the green “Get Started Now” button.

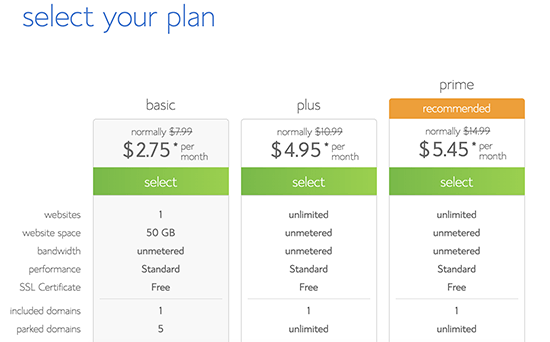
This will take you to the pricing page where you need to click the “Select” button below the plan you want to use.
The Basic and Plus plans are the most popular among small businesses just starting out.
After selecting your plan, you will be asked to choose your domain name.
You need to enter your business name and click on the “Next” button.
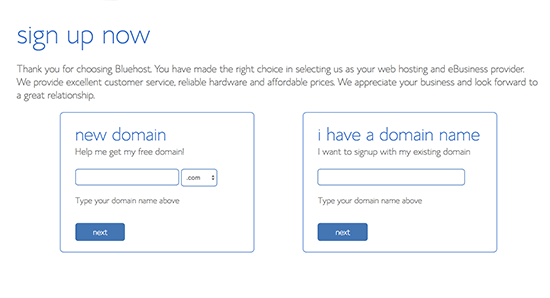
Bluehost will now check to see if a domain name matching your business name is available.
If not, it will show you some alternative suggestions, or you can search for another domain name.
Here are some quick tips on choosing the perfect domain name for your company email address.
- Always choose a .com domain name.See our article on the difference between .com vs. .net domain names to learn more.
- Keep your domain name short and easy to remember and pronounce.
- Do not use numbers or hyphens in your domain name
- Try to use keywords and business website in your domain name to make it unique.
- For example, if stargardening.com is not available, search for stargardeninghouston.com
Choosing a good domain name is crucial for your business but don’t spend too much time on it, or you will never skip this step.
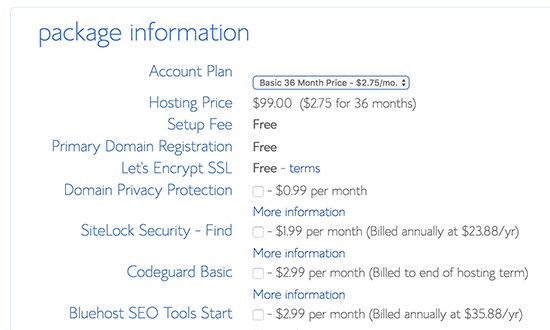
After choosing your domain name, you will need to add your account information and finalize the package information to complete the process.
On this screen, you will see optional extras that you can purchase.
We do not recommend picking them up at this time . If you need it, then you can always add it later from your account.
Finally, you need to enter your payment information to finalize the purchase.
You will receive an email with details on how to login to your web hosting control panel.
This is where you manage everything including managing websites, business email accounts, and other settings.
Step 2. Create a free business email address
In the hosting account control panel, you need to click on the “Email” section and then click on the “Add an email account” tab.
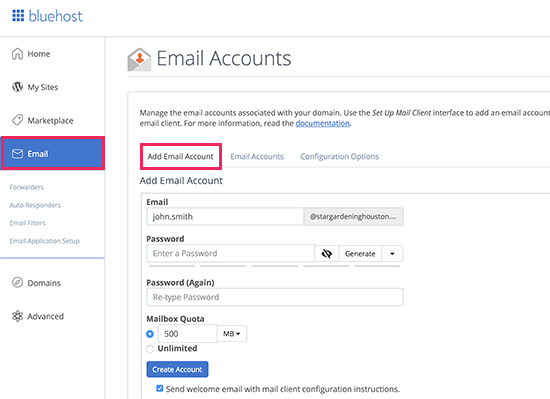
Enter a username and password for your email account, then click the Create Account button.
Bluehost will now create an email account, and you should see a success message.
Step 3. Use your work email account
Now that you’ve created a free business email account, the next step is to learn how to use it to send and receive emails.
Under the “Email” section of your hosting account, switch to the “Email Accounts” tab.
You will see your newly created email address listed there.
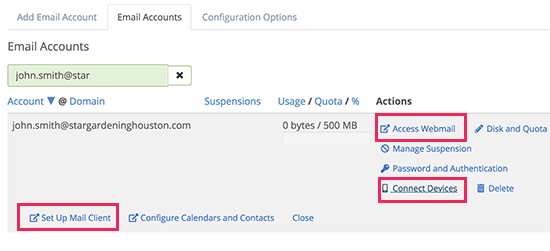
You can click on the “Access webmail” link and Bluehost will take you to the webmail interface.
This is a good option if you don’t want to use a desktop email client or a mobile app on your smartphone.
The downside is that you will have to log into your hosting account every time you want to check your email.
The best way is to click Connect Devices and then click the Mail Client Setup link.
Bluehost will show you the information needed to use your business email address with any mail client or app.
You can use this information to set up business email in Outlook, Gmail, or any mobile or desktop mail app.
Note:
The process for creating a business email is pretty much the same as with other web hosting providers that offer cPanel such as SiteGround, HostGator, DreamHost, and InMotion Hosting.
Method 2: Create a business email address using Google Workspace (formerly G Suite)
Google offers professional business email with Google Workspace (formerly G Suite) which includes Gmail along with other business productivity tools like Docs, Drive and Calendar.
This method isn’t free, but it does allow you to use your business email Gmail account using your own business name.
Although there is a small cost, it comes with several advantages :
- You’ll use the familiar Gmail interface and apps to send and receive emails.
- Google has superior technology that ensures that your emails are delivered instantly, and don’t end up in spam folders.
- Your website hosting company has shared server resources. This means that they don’t want you to send too many emails.
- On the other hand, Gmail will allow you to send up to 2000 emails per day.
Let’s take a look at how to set up a business email address with G Suite.
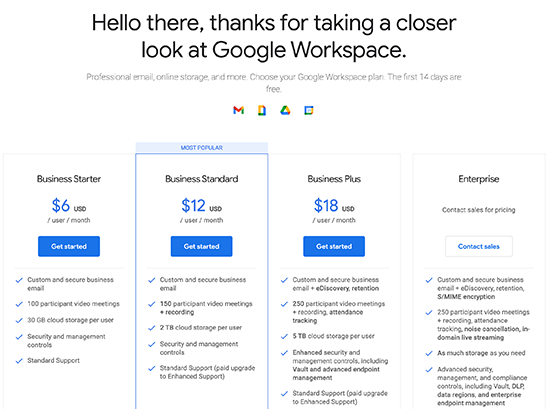
Step 1. Sign up for a Google Workspace account
The Google Workspace Starter plan costs $6 per user, per month.
It gives you access to Gmail, Docs, Drive, Calendar, and audio/video conferencing with 30GB of cloud storage per user.
You will also need a domain name, which you can purchase during registration.
If you already have a domain name and website, you can use your existing domain with G Suite.
To get started, simply visit the Google Workspace website and click the Get Started button.
On the next screen, you will be asked to enter your business name, number of employees, and the country in which you reside.
You can select yourself for only one user account, or choose the number of employees.

Note :
You will be charged for each user account, so it is best to start small.
You can always add more users as needed. Click the next button to continue.
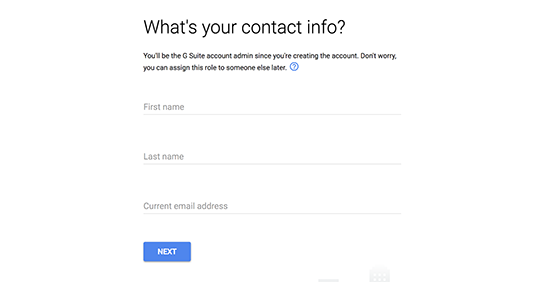
In the next step, you will be asked to enter your personal contact information including name and email address.
Next, you will be asked to choose a domain name. In case you already have a domain name, click on “Yes I have a name I can use”.
If you don’t have a domain, click No, I need one to register a domain name.
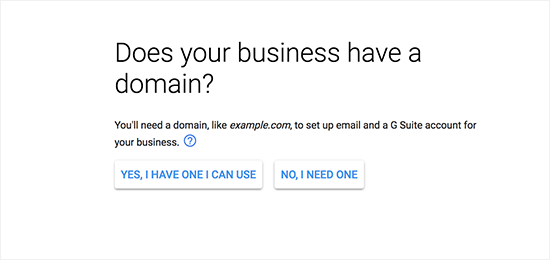
If you need to register a new domain name, you will be charged separately for registering a new domain name.
The cost of the domain name will be displayed on the screen and usually starts at $14.99.
If you are using an existing domain name, you will need to verify that you own that domain name. We’ll show you how to do that later in this article.
After selecting your domain name, you will be asked to create your user account by entering a username and password.
This username will also be your first business email address, so choose a username that you want to use as your business email address.
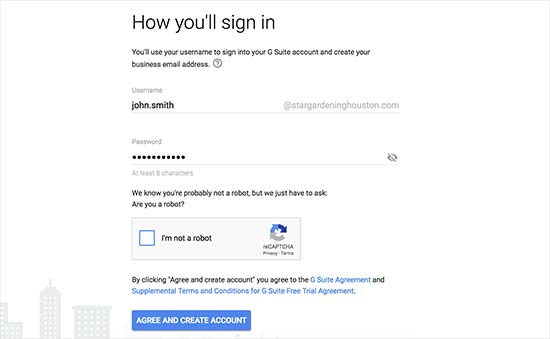
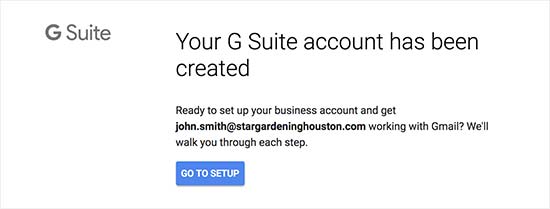
After that, you will see a success message and a button to continue with setup.
Step 2. Set up a business email with Google Workspace / G Suite
In this step, you will complete the G Suite setup by adding users and associating it with your website or domain name.
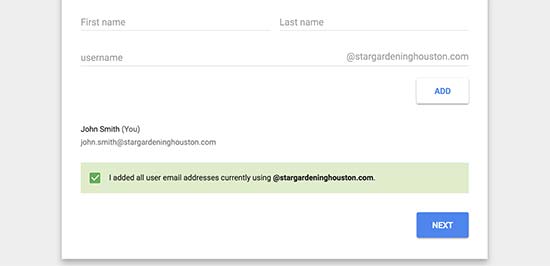
On the setup screen, you will be asked to add more people to your account.
If you want to create more accounts for your employees or departments, you can do so here.
You can also click on “I have added all users’ email addresses” and click on the next button.
Remember, you can always add more users to your account and create their email addresses later when needed.
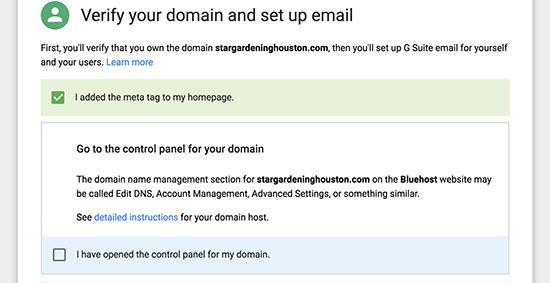
If you’re using G Suite with an existing domain name, you’ll be asked to verify that you own that domain name.
To do this, you will now see the HTML code snippet that you need to add to your website.
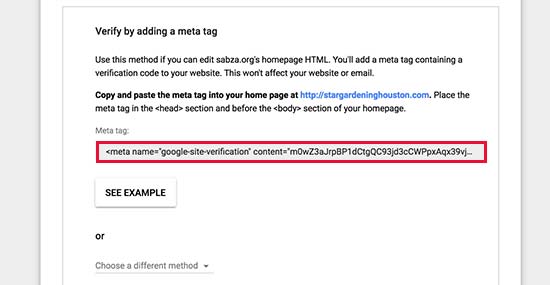
There are other ways to verify your ownership, too. You can upload the HTML file to your website using an FTP client or file manager app in your hosting account dashboard.
If you don’t have a website, you can use the MX Record method to verify that you own the domain name. You will see step by step instructions for doing this once you choose this method.
For the sake of this article, we assume you already have a WordPress website, and we’ll show you how to add a validation HTML code snippet in WordPress.
First :
go to the admin area of your WordPress site to install and activate the Insert Headers and Footer plugin.
For more details, see our step-by-step guide on how to install a WordPress plugin.
When activated, go to Settings » Insert Headers & Footer Page and paste the HTML code you copied from G Suite under the “Scripts in Header” section.
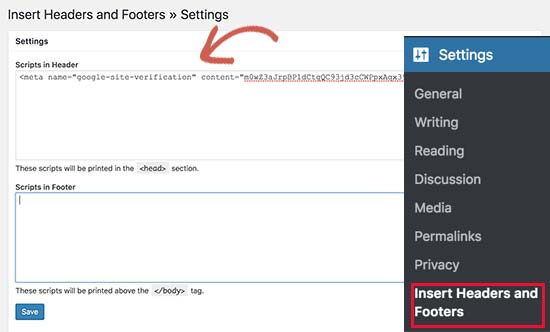
Don’t forget to click the “Save” button to store your settings.
Now go back to the G Suite setup screen and click on the checkbox that says “I have added the meta tag to my homepage”.
Next, you will be asked to enter the MX record entries for your domain name. We’ll show you how to do that in the next step.
Step 3. Add MX records for the domain
Note: This section is for users with existing domain names and websites. If you registered a new domain name via Google, you don’t need to read this.
Domain names tell Internet servers where to look for information.
Since your domain name is not registered with Google, your emails will reach your domain name, but not Google’s servers.
You will need to set up the correct MX records on your domain name settings, in order for Google’s servers to send and receive your company emails.
To do this, you will need to log into your web hosting account, or your domain registrar account.
We’ll show you how to add MX records in Bluehost, but the basic settings are the same on all hosts and domain registrars.
Basically, you will be looking for the DNS settings under your domain name.
Log in to your Bluehost hosting dashboard and click on Domains.
On the next page, select your domain name and then click the Manage link next to the DNS Zone Editor option.
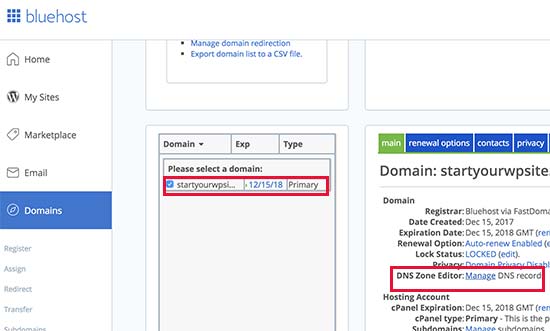
Bluehost will now open your DNS zone editor.
You need to go back to the G Suite setup screen and check the box that says “I opened the control panel for my domain name”.
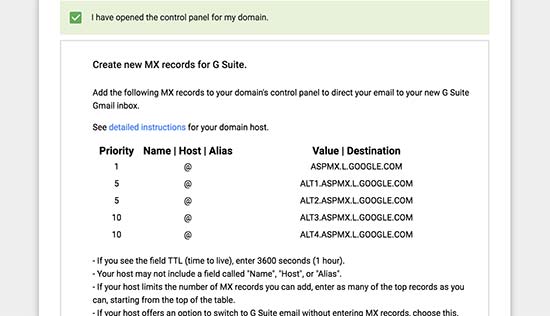
It will now show you the MX records that you need to enter
You’ll also see a link to the documentation showing you how to add these records to dozens of hosting providers and domains.
Here’s how to add this information to your Bluehost DNS settings :

Click the “Add Record” button to save it. Next, repeat the process to add all five lines as MX records.
Once done, go back to G Suite setup and check the box next to “You have created new MX records”
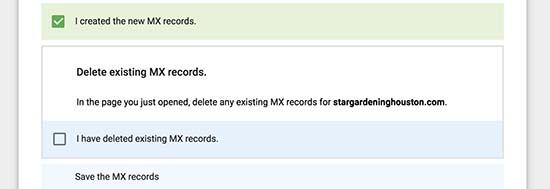
You will be prompted to delete any existing MX records that still point to your website hosting or domain name registrar.
To do this, you need to go back to your DNS Zone Editor and scroll down to the MX records section.
You’ll see the MX records you created earlier as well as the old MX record that still points to your website.
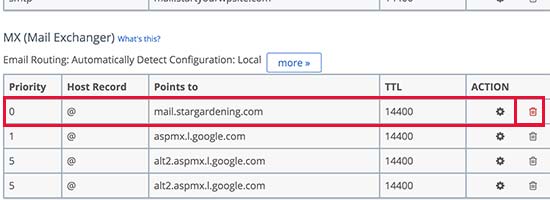
Click the delete button next to the old MX record to delete it.
Next, go back to the G Suite setup screen and check the box that says “You have deleted existing MX records”.
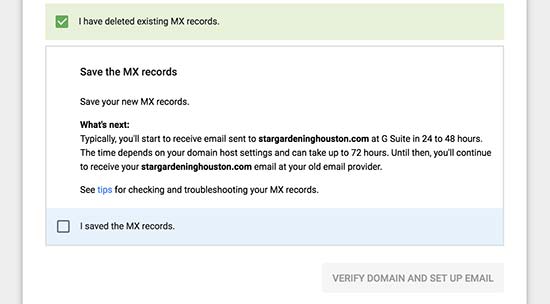
You will now be asked to save your MX records.
For some providers, once you add MX records they are already saved, for others you may need to save MX records manually.
Once you’ve saved your MX records, check the box that says “I’ve saved MX records” in G Suite Setup.
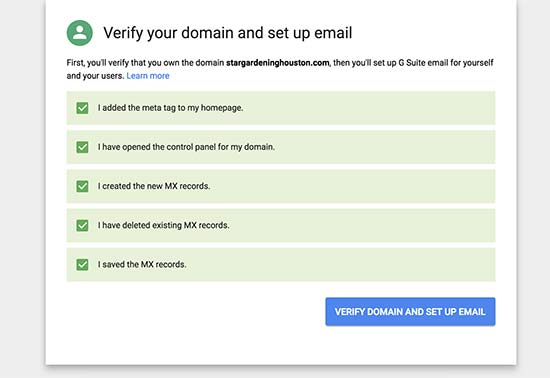
After that you need to click on the “Verify Domain and Setup Email” button to exit the setup wizard.
Step 4. Manage G Suite email
G Suite makes managing your email account easy. You can simply visit the Gmail website to check your email inbox or use the official Gmail apps on your phone to send and receive new emails.
You will need to sign in with your business email address as your username.
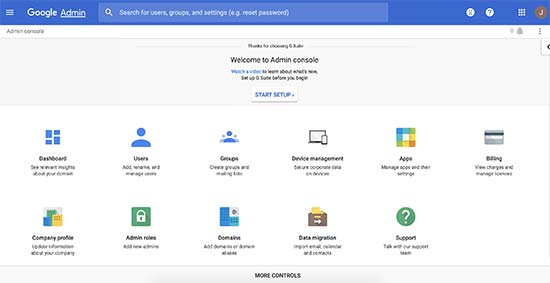
To create more business email addresses, just go to the G Suite Admin console.
From here you can add new users, increase email storage on your mail account, make payments, and adjust your G Suite account settings.
That’s it, we hope this article helped you learn how to create a free business email address or create a professional business address with G Suite.