
https://www.siteground.com/Do you want to put your WordPress site in maintenance mode ?
Maintenance mode allows you to show visitors an easy-to-use notification instead of a broken website. You can also specifically control who can access your site while working on it.
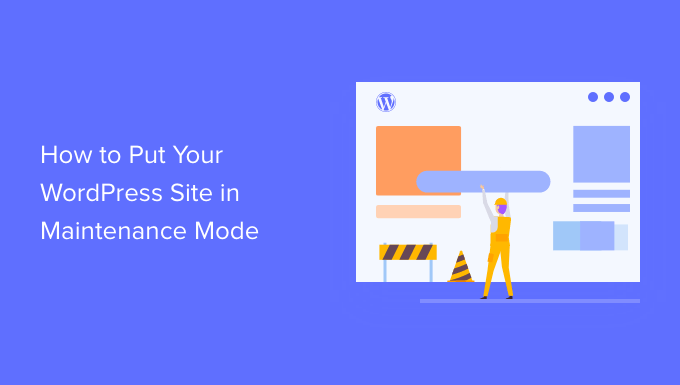
In this article, we will show you how to easily put your WordPress site into maintenance mode.
Why and when do you need to put WordPress in maintenance mode ?
Often you can make changes to your WordPress site without having to put it into maintenance mode .
For example, you can publish new posts, update WordPress and install new add-ons without any downtime.
However, sometimes you may need to work on your website for a longer period. For example, you might want to completely redesign your WordPress blog .
Some changes are also more serious than others, such as setting up a new extension that changes the behavior of your website. While making the change, your website may seem broken to users.
You may even lose the data created during this period .
For example, if you are making major changes to an online store, you may lose any new orders placed by customers.
If your website receives a lot of visitors, you don’t want them to see a broken site.
One solution is to create a phased website so that you can work on your site privately .
Many of the best WordPress hosting companies offer one-click staging websites, including Bluehost, SiteGround and WP Engine .
If you are not using a phased site, it is crucial that you put your website in maintenance mode.
Instead of a broken website, visitors will see a useful maintenance page that allows them to find out what is happening.
You can even suggest some alternative actions that visitors can take, such as following you on social media or joining your email list .
Having said that, let’s take a look at how to put your WordPress site into maintenance mode.
First Method :
setting up WordPress maintenance mode using SeedPro d Plugin (recommended)
The easiest way to create a fully customized maintenance page is to use SeedProd .
SeedProd is the best landing page builder for WordPress, and is used on over a million websites. It allows you to create beautiful pages in WordPress, optimize your 404 page, and even design unique landing pages using drag and drop.
There is a premium version of SeedProd that comes with more than 180 professionally designed templates and blocks.
However, you can put your site into maintenance mode using the free SeedProd plugin , so this is what we will use in this guide . The first thing you need to do is install and activate the SeedProd plugin .
For more details, see our guide on how to install an plugins in WordPress .
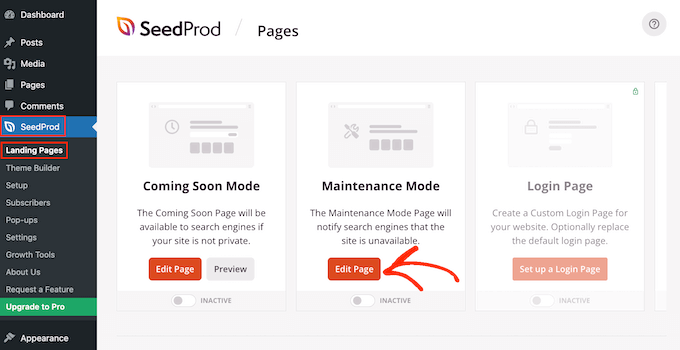
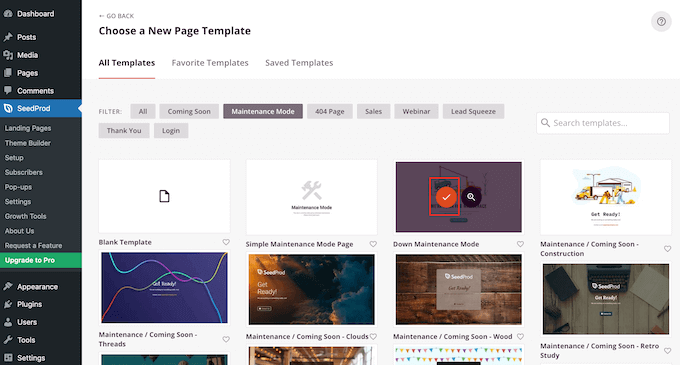
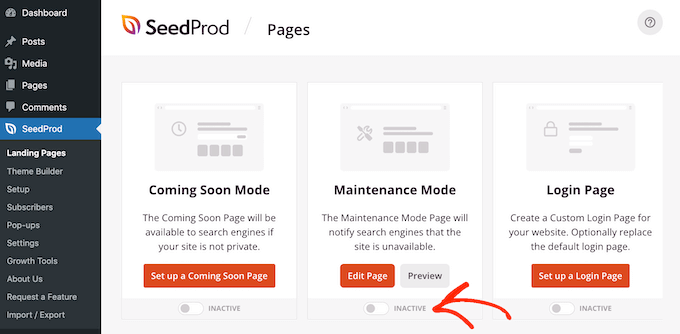
When activated, go to the SeedProd “pages . In the “maintenance mode” section, click the “setup maintenance mode page” button or the “Edit Page”button.
The next step is to build the page that visitors will see when the maintenance mode is enabled.
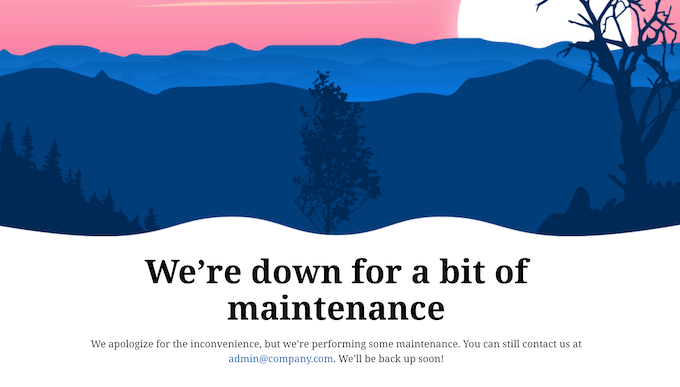
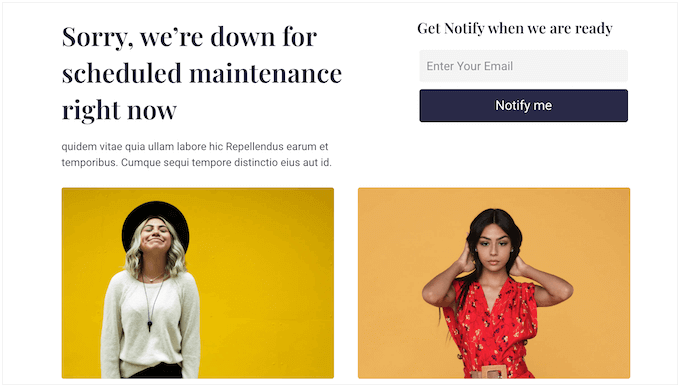
You can either choose a ready-made template or start with a blank design. We use “disabled maintenance mode” in all our photos but you can use any template you want.
To select a template, simply hover the mouse cursor over the thumbnail of the design and then click on the “check mark”icon.
After selecting a template, you will be taken to the drag-and-drop creation tool, where you can start customizing the maintenance mode page.
On the left side of the screen, you will find blocks and sections that you can add to your design. The right side of the page is the live preview.
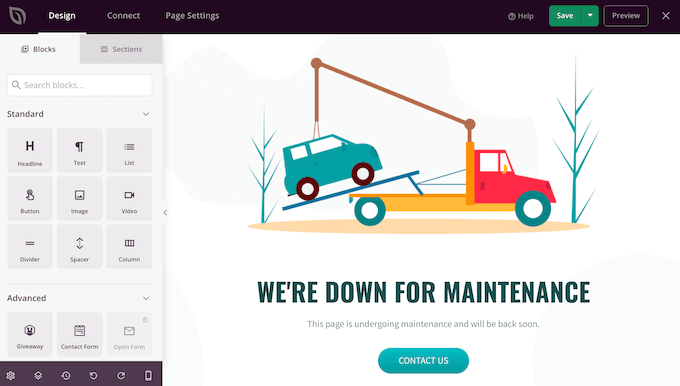
Most templates already have some blocks, which are an essential part of all SeedProd designs. However, you can add more blocks to your maintenance page by dragging them from the right menu and then dropping them into your design.
For example, you can add your own custom logo, videos, contact form and more.
The options you see may vary depending on the other plugins you have installed on your WordPress site. For example, if you have RafflePress, you will be able to make a contest on your maintenance page using the Giveaway group.
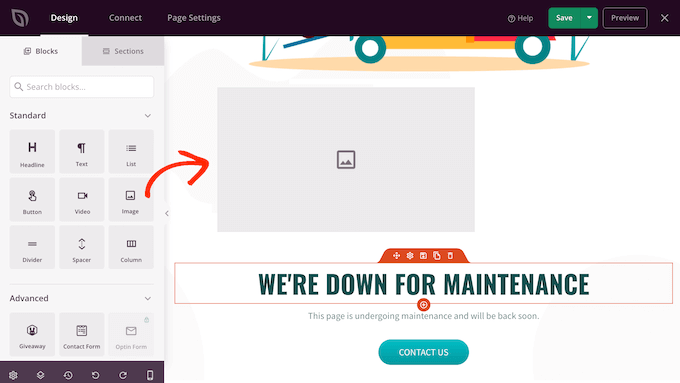
To customize a block, simply click to select that block in your layout. You can then change the block using the settings in the left menu.
To get started, click to select the “Contact Us” button in the live preview. In the left menu you will see the “link” field, which displays “mailto: john@example.com” by default.
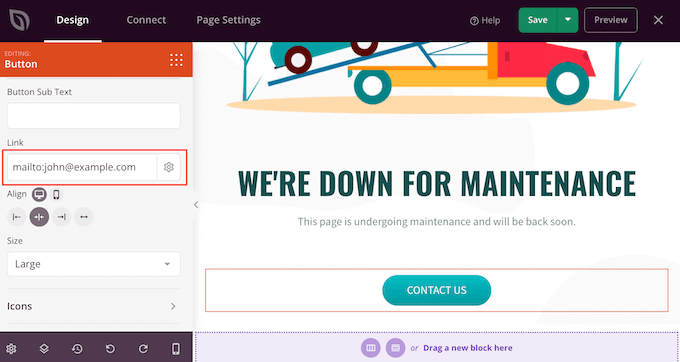
This means that the button will open the visitor’s default email application with the “to” field already filled in as “john@example.com”.
To use your business email address instead, just type this address in the “link”field. Make sure that “mailto:” is not deleted as this opens the default email application for the visitor.
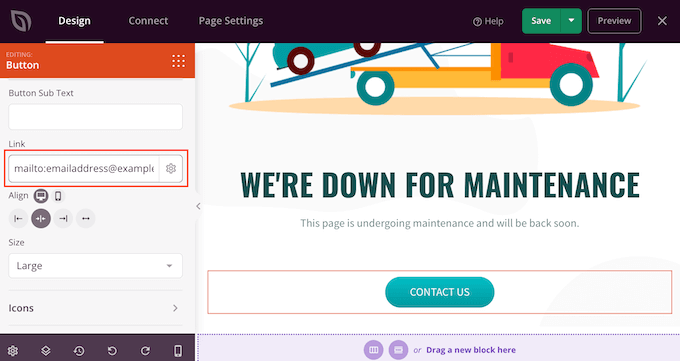
You can also make other changes to the button, including using a different alignment, button text, and changing the button size.
To remove a block from your design, just click on it. You can then select the trash can icon.
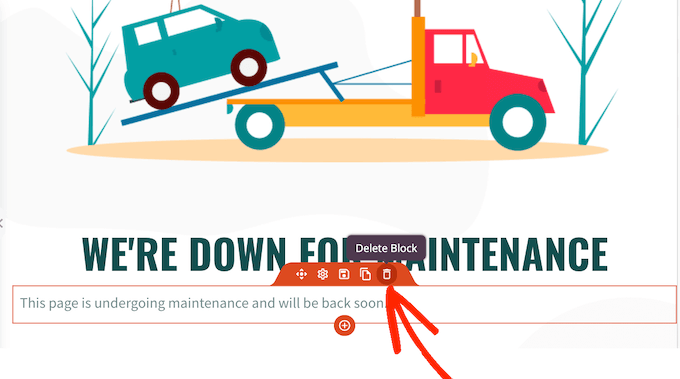
Now you can continue customizing the template by adding new blocks, removing any blocks that you don’t want, and making changes in the right menu.
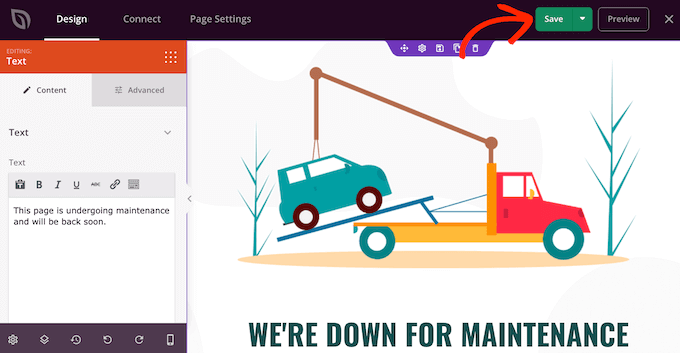
When you are satisfied with the form of the maintenance page, it’s time to publish it. Go ahead and just click on the “Save”button.
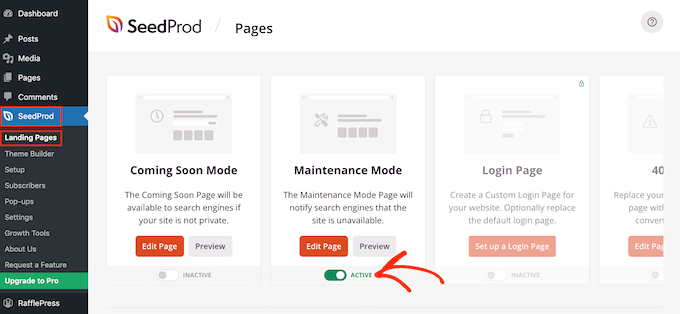
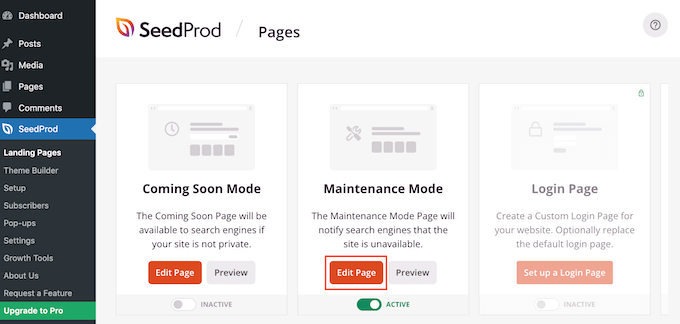
After that, you can enable maintenance mode at any time and show the dedicated maintenance page to visitors by going to SeedProd “landing pages .
Here, click on the Switch in the “maintenance mode” section so that it appears “active”.
Now, if you visit your website in the incognito browser tab, you will see the dedicated maintenance mode page. You will not be shown the maintenance mode because you are logged in to the site.
When you are ready to relaunch your site, just go to SeedProd “landing pages . Under “maintenance mode”, click on the slider to turn it from Green (active) to gray (inactive).
Now, anyone can access your WordPress site.
Control of access to the website for registered users
By default, SeedProd will display the maintenance mode page for all users who are not logged in.
Anyone with an account will still be able to log in.
For example, subscribers of your membership site and customers of the WooCommerce store still have access to their accounts.
However, you may want to change who can access your site during maintenance. For example, if you are developing a site for a client, he may still need access so that he can monitor your work.
You can change the access controls by upgrading to SeedPro Pro .
After upgrading, just go to SeedProd “landing pages and then click” Edit Page ” under maintenance mode.
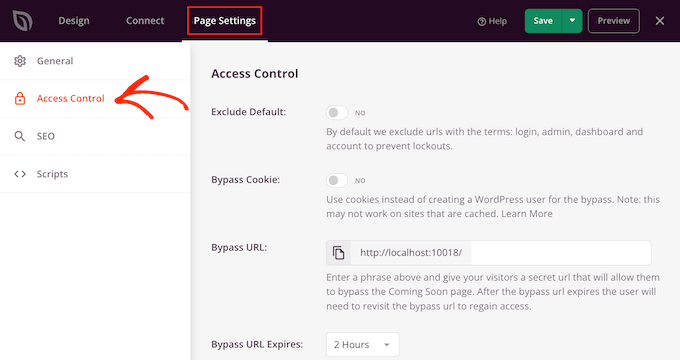
To get started, activating the “Exclude default” slider is a good idea. This will give visitors access to عناوين addresses that contain the terms login, administrator, control panel and account, which will prevent people from blocking access to their accounts.
You may also allow users with certain browser cookies to bypass your maintenance page. Just be aware that if you have enabled the “Bypass Cookie” toggle, it may not work if you are using a caching extension in WordPress .
With that being said, We recommend specifying user roles that can access your site while it is in maintenance mode. To do this, click “Add role” and then select any role from the drop-down list.
You can also include or exclude user roles created by the extension for WordPress Membership or the extension for e-commerce .
When you are satisfied with the access controls, do not forget to click the “Save” button to store your settings.
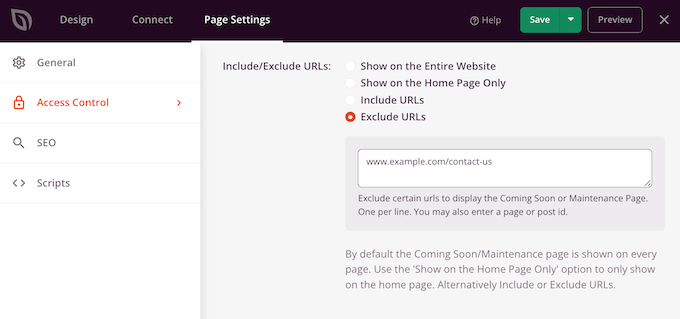
Exclude certain pages from the maintenance mode
SeedProd Pro also allows you to include or exclude certain pages from the maintenance mode. This is useful if you need to allow some users to access certain pages.
For example, if you have a dedicated login page, you usually want to exclude it from maintenance mode. If you are providing customer support via email, you may want to exclude your contact form page as well.
You can do this in The “include / exclude addresses URL”settings. Just choose between” include URLs URL “or” exclude URLs URL ” and then enter your links in the box.
When you are satisfied with how the maintenance page is set up, do not forget to click the “Save” button to store your settings.
The second method :
Set up maintenance mode using the WP Maintenance Mode plugin
Another option is to use the free WP Maintenance Mode plugin . This is a great option if you want to create a page for simple maintenance.
However, this extension uses the standard WordPress page and Post editor, which is not as powerful as SeedProd’s drag-and-drop tool.
The first thing you need to do is install and activate the WP Maintenance Mode extension . For more details, see our step-by-step guide on how to install WordPress plugins .
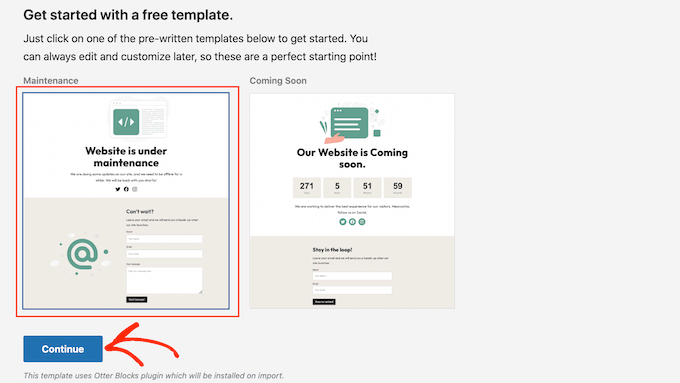
When activated, you can choose between the “maintenance” and “coming soon” form. Since we want to create a maintenance mode, click on the “website under maintenance” form and then select the “Continue”button.
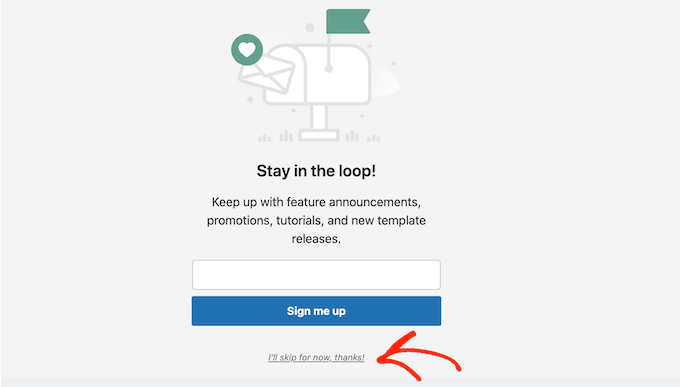
You will now have the option to join the email list for maintenance mode in WP.
You can simply go ahead and click”I’ll skip now, thanks”.
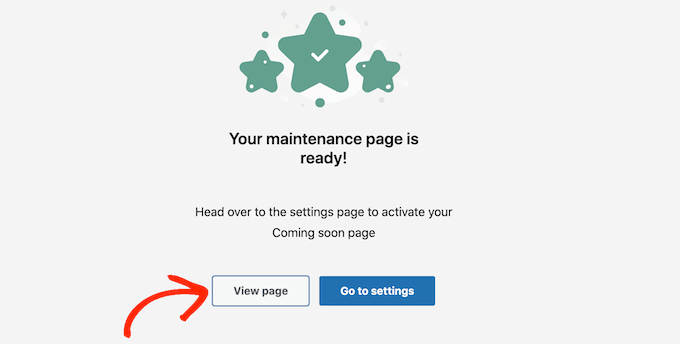
The WP Maintenance Mode will now proceed and create a simple page using its built-in template.
To see this page, just click on “view page”.
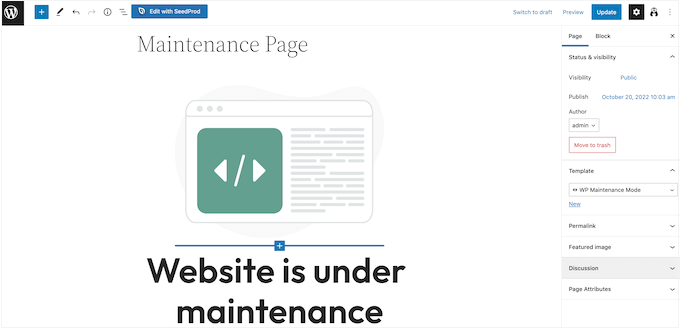
This opens the template in the standard WordPress post editor.
Note :
Are you not satisfied with this default model You can find other WP Maintenance Mode templates by going to the settings “WP Maintenance Mode in the WordPress dashboard. Then click on the “Design”tab.
Now you can make changes to the design in the same way as editing a page or post.
The template has a few social media placeholders that you want to link to your own pages.
Just click on each of these icons and then type the address URL in the small bar that appears.
When you are satisfied with the look of the maintenance page, click the “update” button in the content editor to save the changes.
Now you have designed your page, it’s time to configure the maintenance mode settings by going to the settings “WP Maintenance Mode in your WordPress dashboard.
You can then click on the “General”tab.
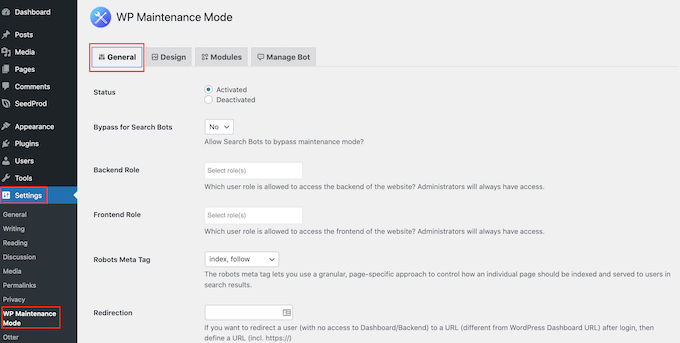
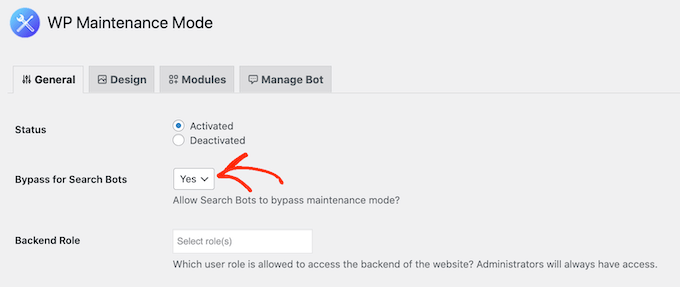
By default, search engine bots cannot see your site while it is in maintenance mode. This can harm your WordPress SEO and may affect where your site appears in search engine rankings, especially if you are going to be doing maintenance for a while.
That’s why we recommend opening the “Bypass for Search Bots” drop-down menu and selecting “Yes”. This will allow any search engine crawlers to bypass your maintenance page.
As a site administrator, you can access the WordPress dashboard and your website while it is in maintenance mode. However, you may want to grant access to other user roles.
You can give users access to the WordPress control panel by opening the “background” drop-down menu and then choosing a user role from the list.
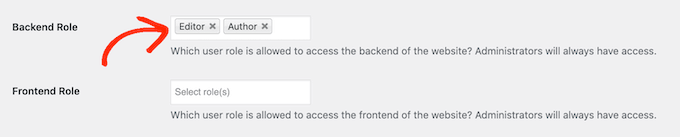
To give visitors access to your public site, use the “frontend” drop-down menu instead.
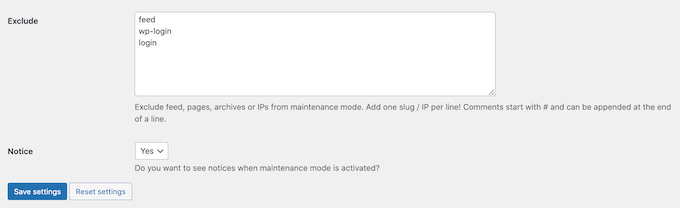
Similar to SeedProd, you can exclude certain pages from the maintenance mode so that visitors always have access to them.
For example, if you have a booking form, you may want to make this page available even when the rest of your site is down for maintenance.
To exclude a page, just add its static link to the “Exclude”box.
If you use Google Analytics to track visitors to your WordPress site, be sure to click on the ” modules ” tab .
You can then open the “use Google Analytics” drop-down menu and select ” Yes ” .
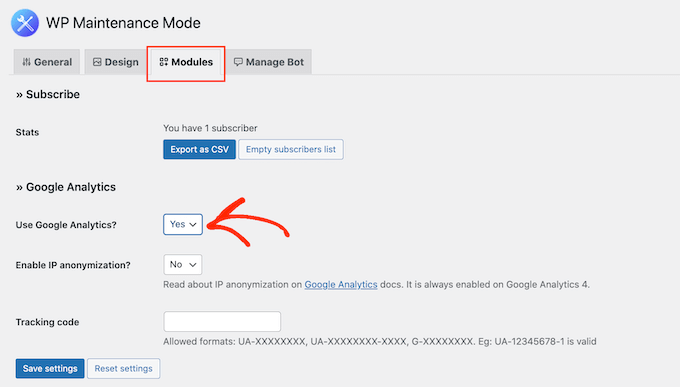
After that, just add your tracking ID to The “Tracking Code”field.
There are a lot of settings that are worth seeing, and most of them are self-explanatory. When you are happy, click the “Save Settings” button to store your changes.
Now, you can activate the maintenance mode at any time. Just select the “General” tab and click on the “activated”radio button.
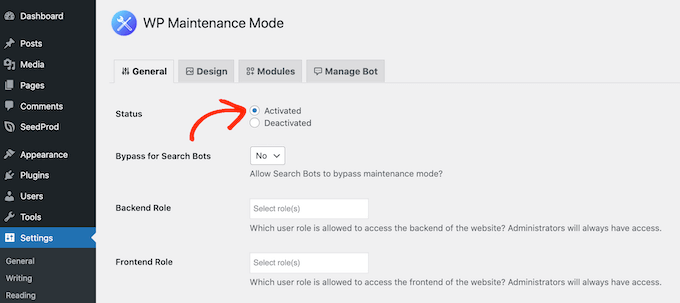
You can then scroll to the bottom of the page and click “Save Settings”. Now, if you visit your site while on the incognito browser tab, you will see the maintenance page.
When you are ready to get your site out of maintenance mode, just go back to the “General” tab and select “inactive”. After that, just click the “Save Changes” button and your website will become available once to anyone who visits it.
We hope that this article helped you learn how to put your WordPress site into maintenance mode.